Chapter 2 - Basic Document Layout
In this chapter we will look at some of the HTML tags that help define the template of a page. The template is an HTML structure that defines how your site looks across many pages. Each page in a website will be different but each page should follow a common brand as the other pages in the website. By defining and committing to a brand, users will be able to distinguish your website from other websites. If a page in your website does not follow the common brand users may feel inclined to leave your website. Think about it. If you were reading your local news site and you go to a page that doesn't look like it belongs to them, what do you do? Most would probably close the page and maybe leave your website altogether.
2.1 - Structuring Page Content
Structuring the Content of a Page
HTML describes and structures, CSS styles - TOP
The primary purpose of HTML tags is to structure and describe the text and graphic content of a Web page. The function of HTML tags is not styling and decorating content, but rather presenting content in such a logical and organized manner that allows the browser to understand and to recognize the information. Browsers render many HTML elements with a default style that proves useful in arranging content on a page; however, these default styles may be changed by using CSS.
In addition to structuring the content of a page, visual styles may also be applied. Different sizes, colors, or text fonts are some of the visual changes that can be made. Graphic images can also be resized and decorated. These tutorials will introduce styling methods that add such kinds of visual appeal to text and graphic elements. Styling elements is primarily done through CSS instead of through HTML. Before covering CSS and advanced styling, it is necessary to become familiar with basic HTML tags that can describe content and be used by browsers to provide some degree of arrangement and style to a page.
Editor versus Browser Displays - TOP
Web page design begins with a standard document setup that gives the page its overall structure. The image below reproduces the standard page template.
<!DOCTYPE html><html lang="en"><head><meta charset="UTF-8" /><title>page title goes here</title></head><body>* page content goes here *</body></html>Listing 2-1. A web page template
Every page designed begins with the coding represented in the image above. The title of the page must be coded within the <title> tag. When the page is opened, the text will appear in the browser’s "Title Bar." Informative content should be added inside the <body> tag. Only the information appearing in the body of the document shows up in the browser window. Text and graphic images are placed inside the <body> tag, and are then surrounded by HTML tags to order and arrange them.
It is important to understand that formatting Web pages can not take place without the usage of HTML tags. To emphasize this point consider the heading and three paragraphs coded in the Notepad editor in Figure 2-1. The information in the browser should be displayed in this same general format.
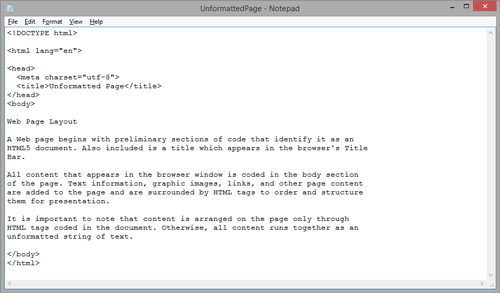
Figure 2-1.
Unformatted web document appearing in the Notepad editor.
As shown above, a heading appears at the top of the document, and all subsequent paragraphs are separated from each other by single blank lines. When entering information into the editor, care must always be taken to ensure that the information entered will appear in the browser in an orderly and readable fashion. Editor formatting has little to do with how the entered information appears as a Web page, but it is still a valuable practice to develop to avoid such careless mistakes as interchanging words like deprecating and defecating.
When the document exemplified above is saved as an HTML file (.htm or .html) and opened in the browser, it is displayed as shown in the below Figure 2-2.
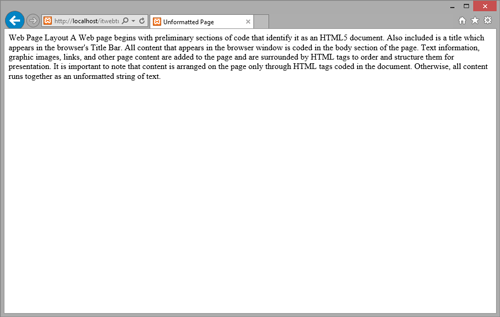
Figure 2-2.
Unformatted Web page appearing in the browser.
The appearance of the information is very different from how it is displayed in the editor. Of course, the reason for this is that no HTML tags appear in the document to guide the browser in laying out the text on the page. Therefore, the browser treats the information as one continuous string of text. All blank spaces and line breaks appearing in the editor are collapsed to single blank spaces separating the words. The result is a single block of text on the page.
Formatted Text Content - TOP
It is an easy step to return to the Notepad editor and include some basic HTML tags to arrange the text for display in the browser. In this case, as shown in Figure 2-3, paragraph tags (coded as <p> container tags) surround the separate paragraphs and a header tag (coded as an <h2> container tag) surrounds the heading line.
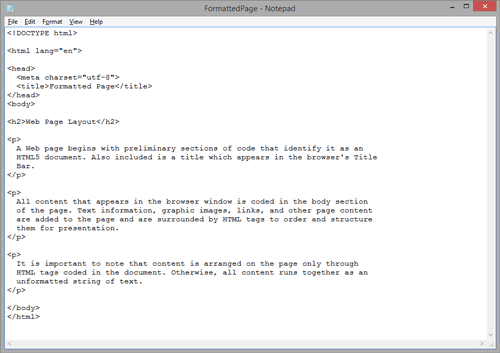
Figure 2-3.
Formatted web document appearing in the Notepad editor.
Now, when the page is opened in a browser, these tags cause the text blocks to be displayed as separate paragraphs as shown in Figure 2-4. The formatting is far from fancy, but it does illustrate the point that the layout of page elements is exclusively controlled by the HTML tags that appear in the document.
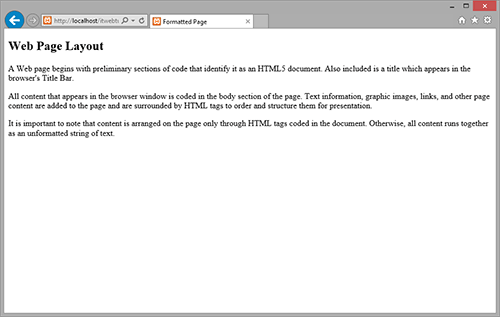
Figure 2-4.
Formatted Web page appearing in the browser.
The next several topics introduce a basic set of HTML tags that bring order and structural formatting to page content. The initial focus is on text arrangement. Later topics will introduce basic tags for adding graphic images and links. For the time being, learn the structural aspects of page design, and begin becoming comfortable with the styling techniques introduced in the following tutorial.
2.2 - Document Structure Tags
Document Structure Tags
HTML 5 includes a new set of semantic document structural tags to define different parts or structure of a web page. A semantic element clearly describes its meaning to both the browser and the web developer.
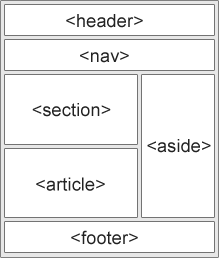
Figure 2-5.
A simple template
Some of the most common HTML 5 structural elements are described below.
The <header> tag - TOP
The <header> element is used as a container for page heading content. The tag typically contains heading tags (<h1> - <h6>), a logo image, or other content that introduces the content. It is possible to have more than one <header> tag per page; however, the <header> cannot be coded within a <footer> or another <header> tag.
The <nav> tag - TOP
The <nav> tag is a block level element used to define major blocks of navigation links or navigation menus.
The <main> tag - TOP
The <main> tag is used to serve a container for major page content that is not repeated in other parts of the page. A web page can include only one <main> element. Additionally, it cannot be included as a child element within a <header>, <nav>, footer>, <article>, or <aside> tag.
The <section> tag - TOP
The <section> tag defines generic sections in a web page such as headers, footers, or any other sections of the document. In this context, a section is a thematic grouping of content.
The <article> tag - TOP
The <article> element represents a complete, or self-contained, composition in a document, page, application, or site that is, in principle, independently distributable or reusable.
The <aside> tag - TOP
The <aside> tag is a block level element that defines content aside from the content it is placed in. The aside content should be related to the surrounding content.
The <footer> tag - TOP
The <footer> tag is a block level element that defines footer information for an entire web page or section of the document. The content of the <footer> typically consists of contact information, copyright, links, or logos. In some cases, a web page may contain multiple <footer> tags.
The <figure> tag - TOP
The <figure> tag specifies self-contained content, like illustrations, diagrams, photos, or code sections. By default, this is a block level element with 40px right and left margin settings.
The <figcaption> tag - TOP
The <figcaption> is a block level tag that defines a caption for a <figure> element discussed in the previous section. The <figcaption> tag is normally coded as the first or last child element of the <figure> tag.
2.3 - Paragraphs
Paragraphs
The <p> Tag - TOP
Most Web pages are text documents. In written languages such as English, letters are grouped into words, words are organized into sentences, and sentences are structured into cohesive paragraphs. HTML provides a way for content to be marked as a paragraph. By default, browsers render text marked as a paragraph with a single blank line preceding and following the text. Text inside a paragraph is also aligned to the left margin of the page and is word-wrapped inside the browser window.
In order to format a block of text as a paragraph, the <p> (paragraph) tag surrounds the enclosed text. The general format for this tag is given in Listing 2-1.
<p>Text</p>Listing 2-1. General format for the
<p>tag.
Any amount of text can appear between the opening and closing tags. When displayed in the browser, the enclosed text is single spaced and preceded and followed by a single blank line to separate it from surrounding page content. The <p> tag is classified as a container and block-level element.
You can see the effects of <p> tags in the Web page shown previously in Listing 2-2 which displays text as three separate paragraphs. These tags are added in the editor as shown below.
<p>A Web page begins with preliminary sections of code that identifies it as an HTML5 document. Also included is a title which appears in the browser's Title Bar.</p><p>All content that appears in the browser window is coded in the body section of the page. Text information, graphic images, links, and other page content are added to the page and are surrounded by HTML tags to order and structure them for presentation.</p><p>It is important to note that content is arranged on the page only through HTML tags coded in the document. Otherwise, all content runs together as an unformatted string of text.</p>Listing 2-2. A web page formatted with paragraph tags.
The text is now easily readable because organization is brought to its information content. Note that back-to-back paragraphs are separated by a single blank line even though each <p> tag itself produces a blank line before and after a paragraph. The browser collapses into a single blank line: the one that follows a paragraph and the one that precede the next.
Note that on this and subsequent pages complete coding for a Web page may not be shown in order to focus on the code being discussed. Still, it is assumed that the code shown is surrounded by the page preliminaries down through the<body>tag and by the closing</body>and</html>tags.)
The <blockquote> Tag - TOP
The <blockquote> tag offers a way to indent a block of text, to offset it from surrounding content for special emphasis as would be done for a quoted citation from which the tag gets its name. This container tag indents its enclosed text a fixed number of pixels (approximately 40 pixels) from the left and right margins. Its enclosed text is word-wrapped and preceded and followed by a blank line. The general format for the <blockquote> tag is shown in Figure 2-7.
<blockquote>text</blockquote>Figure 2-7. General format for the
<blockquote>
According to HTML 5 standards, the <blockquote> is used to mark content that is quoted from another source. In practice, the <blockquote> should be used only in the correct context to mark a block quotation. For our purposes, it currently serves as a convenient way to indent any block of text.
In the following example, a <blockquote> tag offsets the middle paragraph from surrounding text. Browser output is shown in Figure 2-8.
<p>Here are three blocks of text. This first paragraph is formatted with a standard paragraph tag and is blocked at the left margin of the page.</p><blockquote>This second block of text is formatted with a blockquote tag to indent its left and right margins approximately 40 pixels from the edges of the page.</blockquote><p>This final block of text is coded like the first one. It is enclosed within a standard paragraph tag and is blocked at the left margin.</p>Listing 2-4. A text block formatted with a
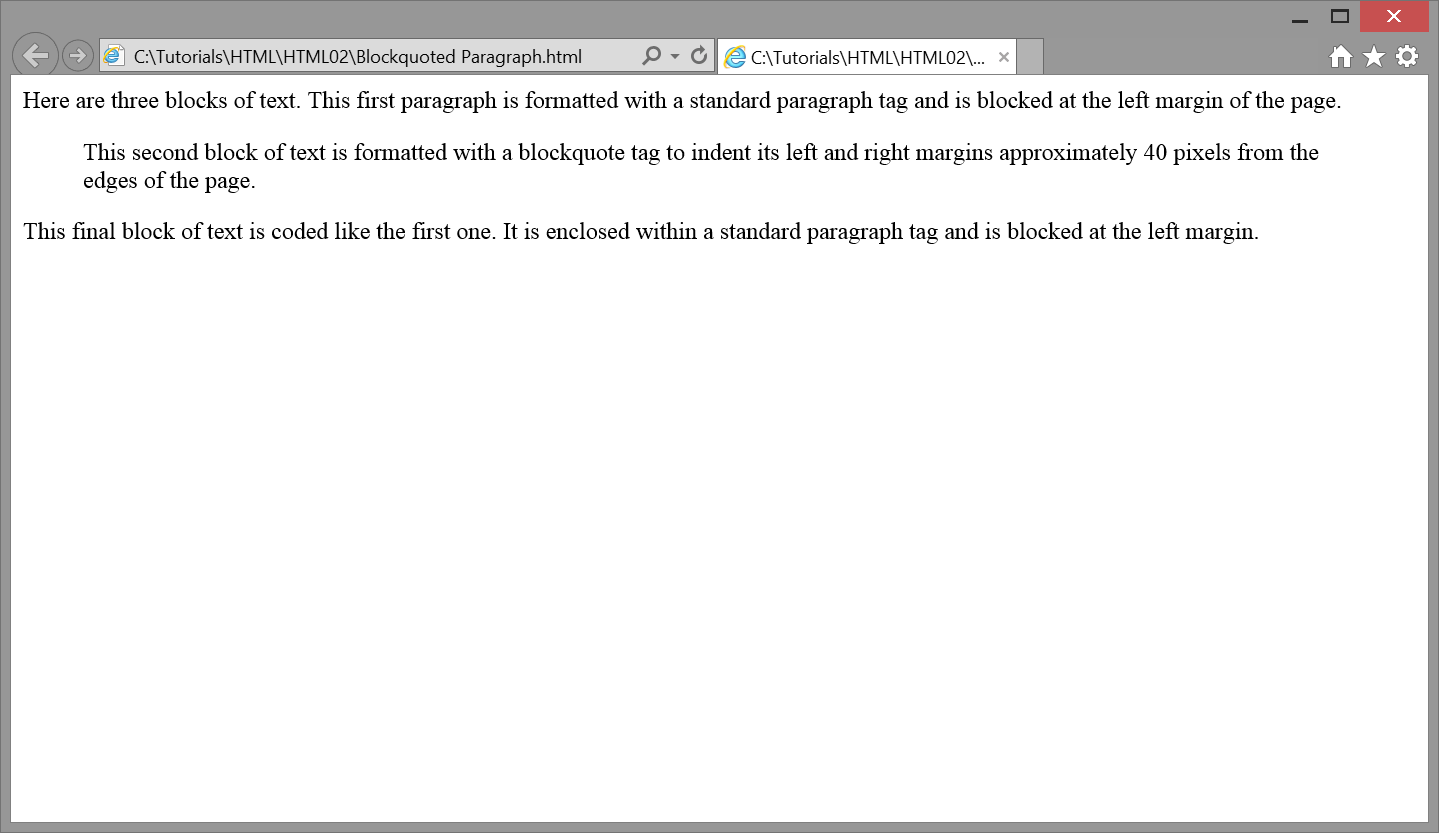
Figure 2-8. Applying the <blockquote> tag to a paragraph.
Similar to the way it appears in the browser, the above editor coding shows the blockquoted text offset with blank lines and indented. As you know, this editor formatting is not required and has no effect on browser output that is controlled solely by HTML tags. Nevertheless, it is good practice to arrange editor coding to resemble browser output the best way possible for visual indication of the display relationships among sections of page content. It makes it easier to spot missing or miscoded tags when editor coding is well spaced and indented.
Nested Blockquotes - TOP
In the following example, <blockquote> tags are used to offset three blocks of text. The middle one is further indented inside its outer blockquoted paragraphs. Browser output is shown in Figure 2-9.
<p>Here are five blocks of text. This first block is formatted with a standard paragraph tag and is blocked at the left margin of the page.</p><blockquote>This second block of text is formatted with a blockquote tag to indent its left and right margins approximately 40 pixels from the edges of the page.<blockquote>This block of text is also surrounded by blockquote tags. It is further indented within the margins produced by its outer blockquote tag.</blockquote>This block of text is aligned like the second block of text since it also appears inside the outermost blockquote tag.</blockquote><p>This fifth block of text is coded like the first one. It is enclosed within a standard paragraph tag and blocked at the left margin.<p>Listing 2-5. Text formatted with nested
<blockquote>tags.
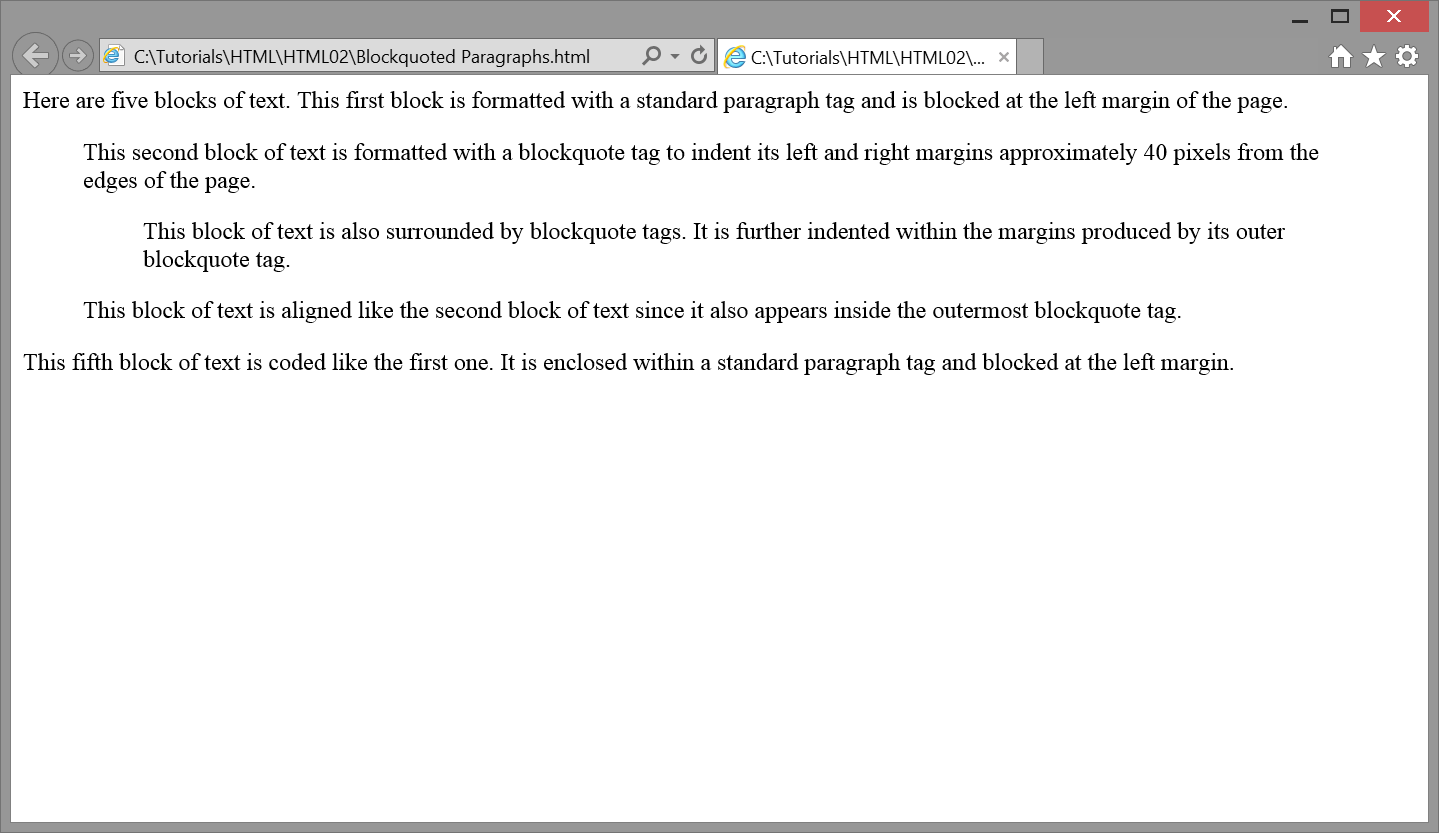
Figure 2-9. Text formatted with nested <blockquote> tags.
In this example, the two <blockquote> tags are nested; that is, a <blockquote> tag appears inside a <blockquote> tag.The outer <blockquote> tag surrounds and indents its three contained text blocks approximately 40 pixels from the left and right margins of the page. The inner <blockquote> tag indents its enclosed text an additional 40 pixels from the margins established by the outer tag. Any additional nested tags further indent their enclosed text from the previous margins.
When nesting <blockquote> tags inside one another, make sure that opening and closing tags are properly paired, and that inner tags are fully closed inside their next outer-most enclosing tags. As in the case with <p> tags, back-to-back <blockquote> tags have their preceding and following blank lines collapsed to a single blank line.
Remember that the <blockquote> tag should not be used to just indent text. Instead it should only be used when displaying large blocks of quoted text within a web document. In a later tutorial, you will learn style sheet methods that can be used for indenting text.
Deprecated (OLD) Tags and Attributes - TOP
HTML 5 is a replacement for the older XHTML and HTML4 languages. In addition to adding many new elements and features, HTML 5 retains many of the tags found in previous HTML versions. Still, many older styling attributes are no longer supported officially by HTML 5. Many of these attributes may still be recognized by browsers which support compatibility with older HTML versions. For example, the <p> tag historically included the align attribute to control text alignment. For instance, by setting this attribute to <p align="center"> the text on each line of a paragraph is centered rather than aligned at the left margin.
In HTML 5, the align attribute is not supported. It is recommended that you refrain from using it and other styling attributes which have been phased out. Instead, newer style sheet declarations should be used to produce the same effect. Still, deprecated attributes are described in these tutorials since you may encounter them on existing Web pages even though most attributes are not valid under HTML 5 standards.
Certain HTML tags are also deprecated under HTML 5. Tags that are being phased out are presented since you will likely encounter them in existing pages. These tags may display properly in modern browsers, but newer alternatives should be used in their place. Furthermore, HTML 5 changes the contextual meaning of some older tags. These tags should now be used in the context where they are appropriate, instead of simply being used for styling purposes.
2.4 - Line Breaks
Line Breaks
The <br /> Tag - TOP
Coding paragraphs with <p> tags is the most common method of structuring text on a Web page. Most Web pages are text pages, and paragraphs are convenient and readable methods of text presentation. Other varieties of text structuring are nonetheless available.
The <br /> (line break) tag causes the browser to end a line of text and to continue display on the next line in the browser window. It does not, as in the case of paragraphs, leave blank lines before or after the ended text line. The general format for the break tag is shown in Figure 2-10.
<br />Figure 2-10. General format for
<br />tag. Note that in HTML5 the/is optional.<br>is fine but note that it does not have a closing</br>.
The <br /> tag is not a container tag. It does not enclose text and it does not have an accompanying closing tag. HTML5 elements that do not enclose text and have no accompanying closing tag are referred to void elements. This empty tag is simply placed within the text wherever a line break should occur. The tag is handy for displaying lists of items, lines of verse, or other groupings of individual, single-spaced text lines. For example,the following code uses line breaks to end individual lines of verse packaged inside a <blockquote> tag.
<p>Here is a tale about Mary and a pesky little lamb that followed her anywhere and everywhere she went.</p><blockquote>Mary had a little lamb,<br />Its fleece was white as snow;<br />And everywhere that Mary went,<br />The lamb was sure to go.</blockquote><p>Mary had an awkward social life. It's awfully difficult to date with sheep trailing around after you all the time.</p>Listing 2-6. A text block formatted with line breaks.
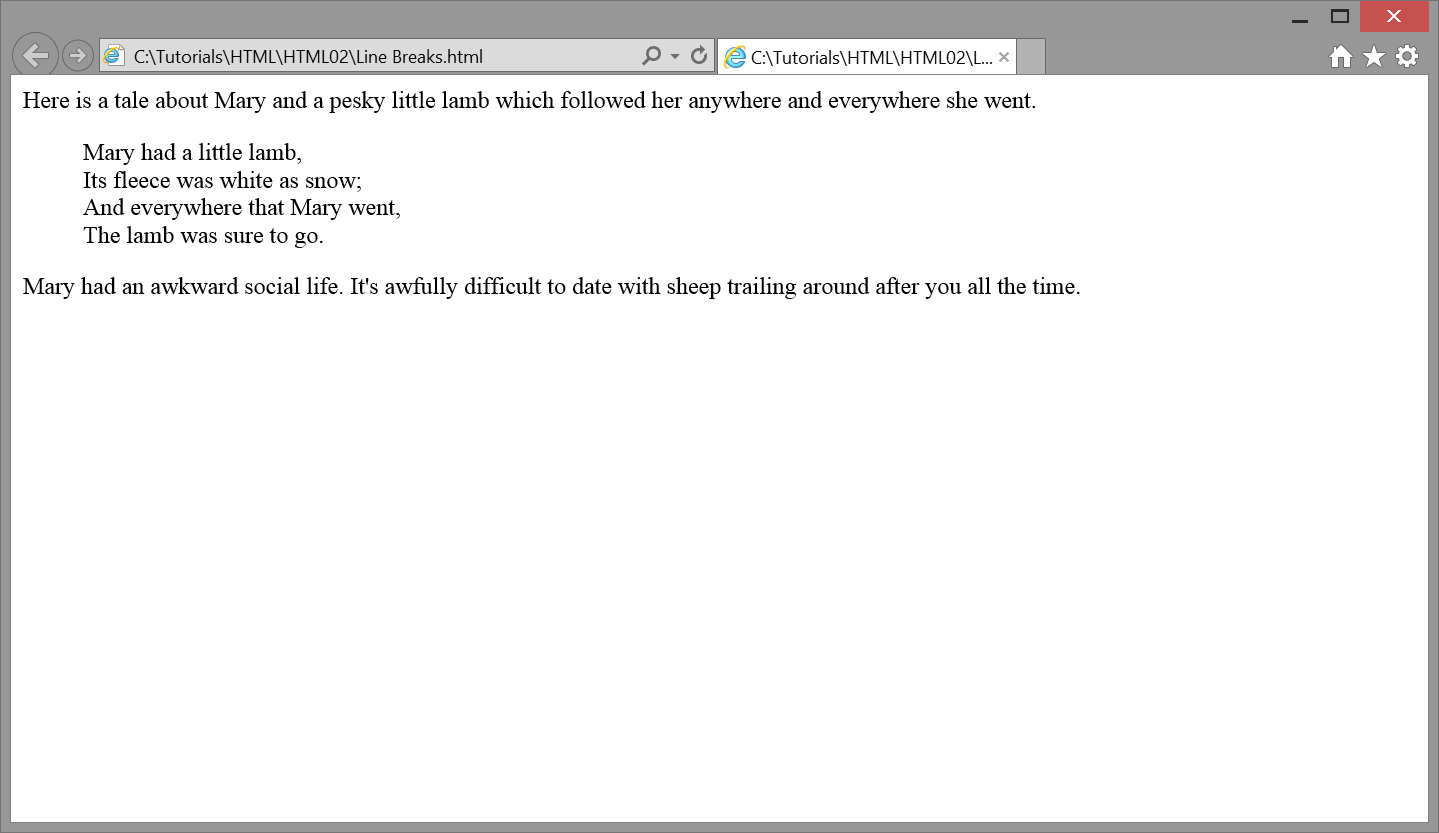
Figure 2-11. Using line break for single-spaced output.
The four lines of verse are enclosed inside a blockquoted paragraph to offset and indent them from surrounding paragraphs. Each line of verse appears on a separate text line on a single space below the preceding line.
Multiple Line Breaks - TOP
With <p> and <blockquote> tags, a single blank line appears before and after the enclosed indented text block. When <br /> tags are inserted to end lines of text, no spacing appears between the lines. This is the correct way to use the <br /> tag. Historically, multiple <br /> tags were often used to insert extra blank lines in order to increase vertical spacing between lines of text or between other content appearing on the page. This practice is no longer preferred under HTML 5, and should be replaced with style sheets where necessary.
Below is a recoding of the previous page to leave an additional blank line before and after the blockquoted verse. These blank lines are produced by coding <br /> tags to force additional line breaks. Browser output is shown in Figure 2-12.
<p>Here is a tale about Mary and a pesky little lamb that followed her anywhere and everywhere she went.<br /><br /><br /></p><blockquote>Mary had a little lamb,<br />Its fleece was white as snow;<br />And everywhere that Mary went,<br />The lamb was sure to go.</blockquote><p><br />Mary had an awkward social life. It's awfully difficult to date with sheep trailing around after you all the time.</p>Listing 2-7. A page formatted with multiple line breaks.
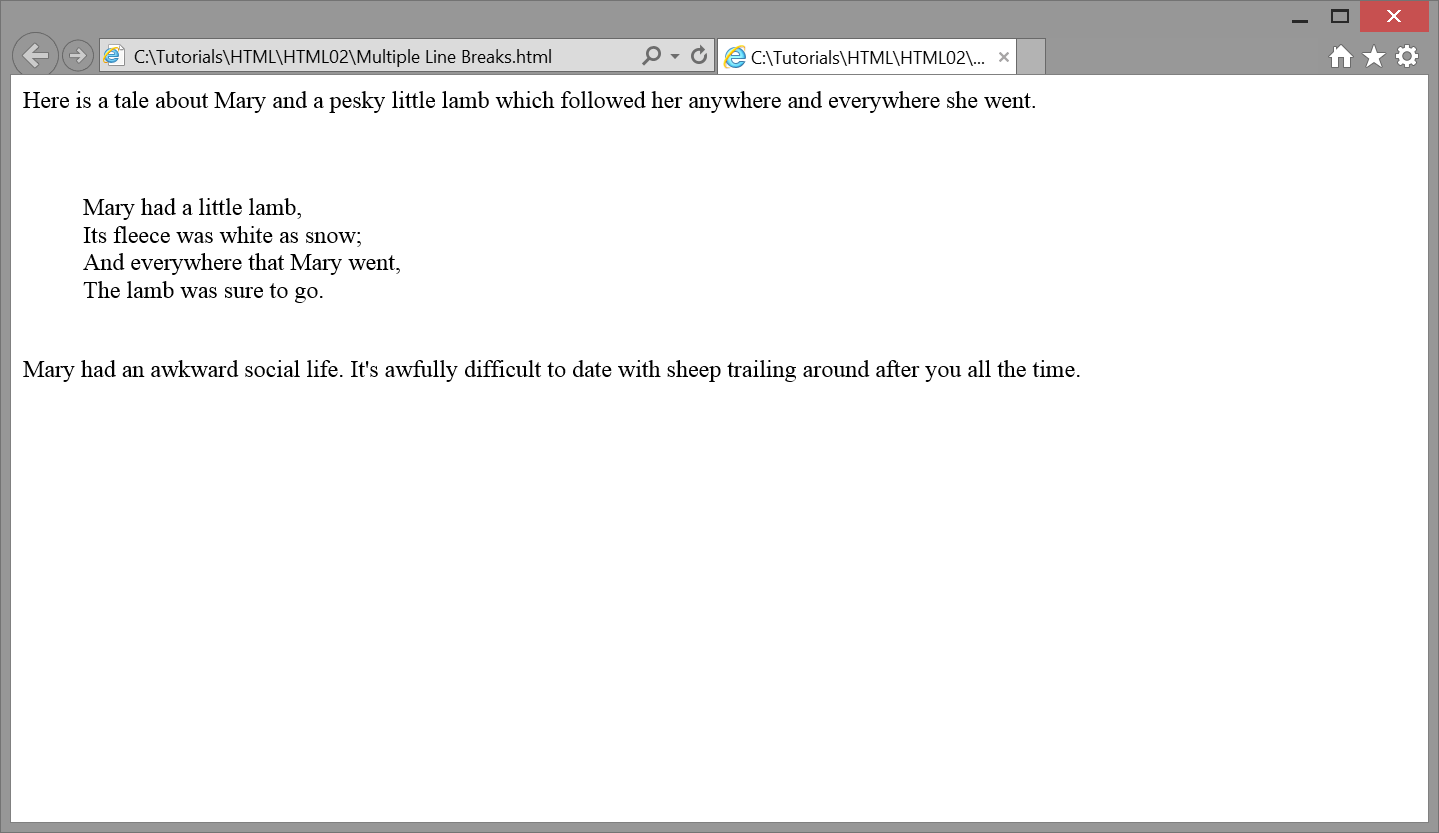
Figure 2-12. Using line breaks for single-spaced output.
Each <br /> tag inserts an additional line break on the page. Therefore, you can code multiple <br /> tags back-to-back to produce multiple blank lines down the page.
Notice that it requires three <br /> tags at the end of the first paragraph to match the number of blank lines given by the single <br /> tag at the beginning of the last paragraph. This is a peculiarity of the way the browser renders the tag at the beginning and end of paragraphs. You may have to experiment to determine the number of tags to code to produced the desired number of blank lines. Still, it is preferable to control vertical spacing with other block level elements or style sheets.
TOP | NEXT: Headings
2.5 - Headings
Headings
The Heading Element - TOP
Text appearing on a Web page is displayed in a default font style and size unless specified otherwise. Most browsers display text in the Times New Roman font face, or font family at approximately 12-point size. In order to add visual variety to your pages, you will likely want to choose other font faces and sizes for different sections of your document. This is a topic that is taken up in more detail later; however, there are simple ways to change text sizes to permit you to add various levels of headings to your pages.
The <hn> (heading) tag is a block-level and container tag that encloses a string of text for display in one of six heading styles. Its general format is shown in Figure 2-13.
<hn>Heading Text</hn>Figure 2-13. General format for heading tags.
The number n in the tag ranges from 1 (largest) to 6 (smallest). These six heading levels are coded in the following example and displayed in the browser as shown in Figure 2-14. A standard paragraph is displayed for comparison.
<h1>This is Heading Level 1<h1><h2>This is Heading Level 2<h1><h3>This is Heading Level 3<h1><h4>This is Heading Level 4<h1><h5>This is Heading Level 5<h1><h6>This is Heading Level 6<h1><p>This is a normal text paragraph.</p>
Listing 2-8. Creating headings with the <hn> tag.
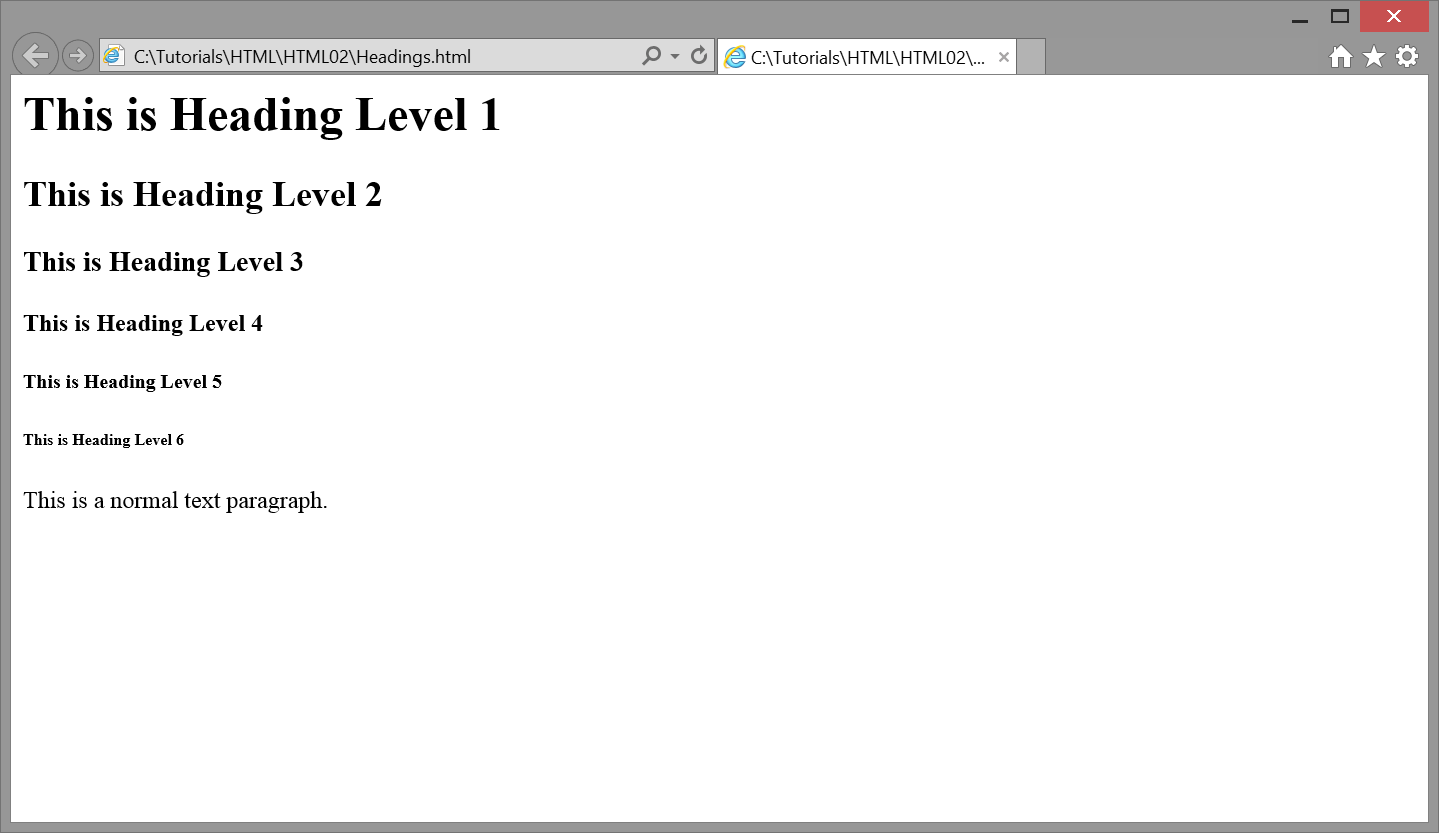
Figure 2-14. Browser display of <hn> tags
Headings are displayed in bold characters in the default font face. They appear on a line by themselves preceded and followed by a single blank line. Thus, the <hn> tag cannot be used to change text sizes. In the middle the tag cannot be used to change text sizes in the middle of a line or middle of a paragraph since it forces a line break before and after its enclosed text. It is used for block-level, stand-alone text, and is most often used as content headings to identify and set apart sections of a Web page.
HTML 5 Heading Semantics - TOP
While heading tags do provide a convenient way to style text, they are designed to mark the heading for a section of content on the page. Headings with lower numbers are considered higher in rank, and content on a page should be structured with the appropriate header ranking. Listing 2-8-1 illustrates this use of headings to section content.
<h1>North America</h1><p>North America is a large continent which contains many countries</p><h2>The United States of America</h2><p>The United States of America is a country located in North America</p><h3>The State of Georgia</h3><p>Georgia is one of fifty states found in The United States of America</p>
Listing 2-8-1. Using headings to section content.
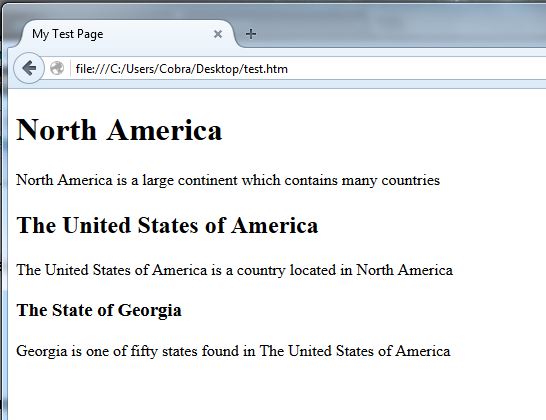
Figure 2-15. Heading and paragraphs displayed in browser.
The main section, "North America", is marked with an <h1> tag to indicate that it is the start of a major section on the page. Next, "The United States of America" is marked with an <h2> tag to indicate that it begins a subsection of "North America". Finally, "The State of Georgia" is marked with an <h3> tag to indicate that it begins a subsection of "The United States of America". In this way, tags can be used to section and subsection content on a page.
Deprecated align Attribute - TOP
Headings can be aligned to the left (default) or right, or they can be centered on the line by applying the
align="left|center|right"
attribute to the <hn> tag. The following code, for example, centers a heading horizontally between page margins.
<h1 align="center">Centered Heading>></h1>
Since align is a deprecated attribute under HTML 5 standards, it should be used only as a temporary method to align headings. Later tutorials cover style sheet standards for aligning text horizontally on a page.
TOP | NEXT: Horizontal Rules
2.6 - Horizontal Rules
Horizontal Rules
The Horizontal Rule Element - TOP
The primary way to separate and identify sections of a Web page is by use of major and minor headings coded within tags. Paragraph level content within these sections can also can be visually separated by displaying horizontal rules between them. In addition to its visual properties, HTML 5 prescribes the horizontal rule for use when a thematic break among such content is required. The general format for this tag is shown in Figure 2-15.
<hr />
Figure 2-15. General format for the
<hr />tag. Note that in HTML5 the/is optional.<hr>is fine but note that it does not have a closing</hr>
The <hr /> tag causes a line break with the rule appearing on a line by itself. The default rule is 2 pixels in height and spans the width of the browser window. The rule shown in Figure 2-16 is produced by the <hr /> tag coded on a line by itself as show in Listing 2-9.
<h2>Horizontal Rules</h2><p>A horizontal rule is used to separate content sections of a page. The following
is a default rule.</p><hr /><p>The rule is 2 pixels in height and spans the width of the browser window. It is
preceded and followed by blank lines.</p>Listing 2-9. Code to create a horizontal rule between two paragraphs.
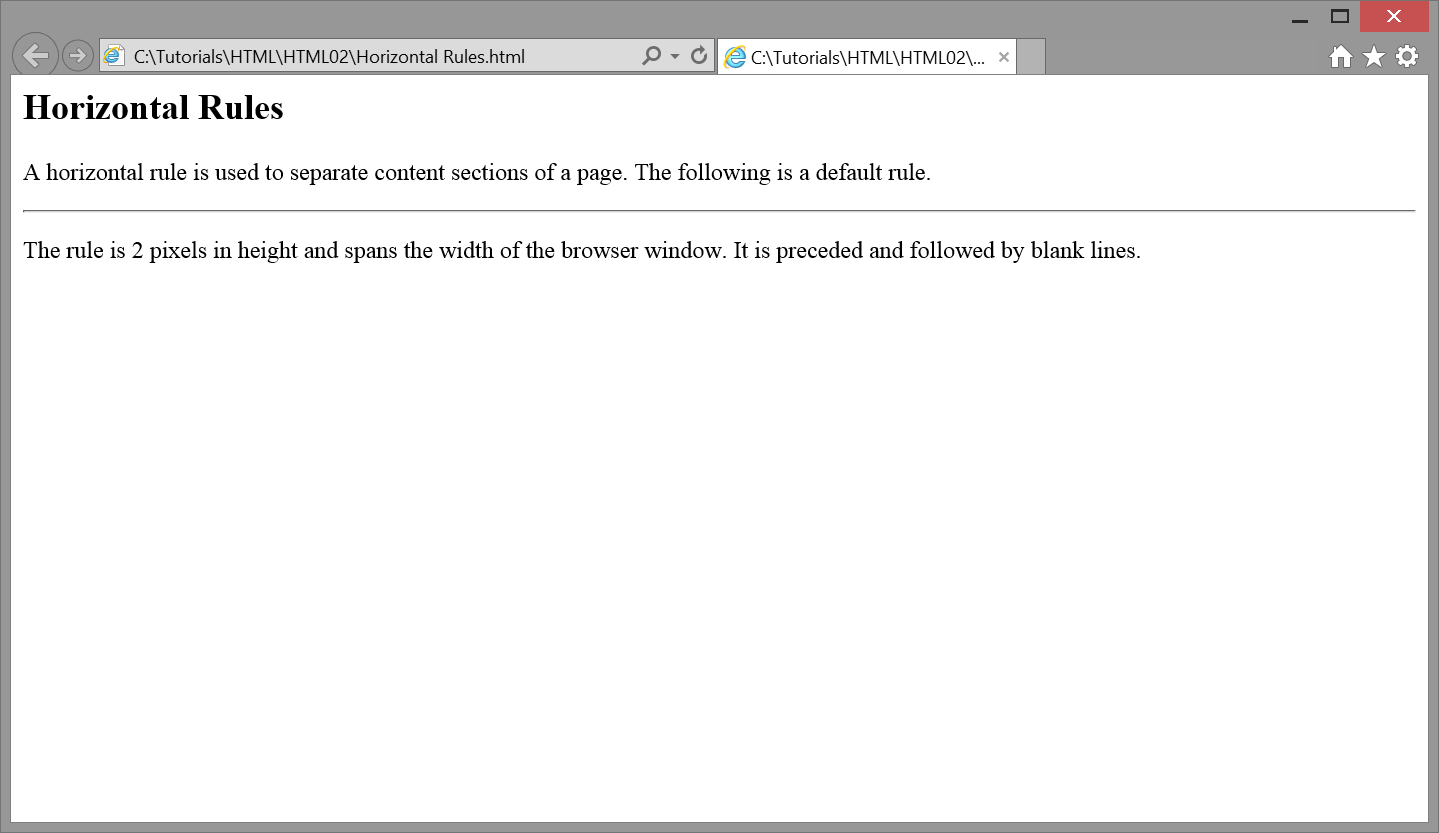
In a later tutorial you learn how to style a horizontal rule by adjusting its height, width, color, alignment, and display characteristics. For present purposes, the default rule can be effective in visually breaking up text without starting a new section.
Deprecated <hr /> Attributes - TOP
Historically, the <hr /> tag included the following attributes to style the rule. These attributes are deprecated, but many browsers still recognize them.
align="left|center|right"
size="n"
width="n|n%"
noshade
color="color"
The align attribute positions the rule to the left (default), centered, or to the right across the line. The size attribute sets the height of the horizontal rule in pixels. The width attribute sets the rule's width in pixels or as a percentage of the window width. Rules can be displayed as a solid bar by coding noshade (without an associated value) and assigned a color with the color attribute. The color value is given as a color name or hexadecimal value. We will discuss such assignments in a later tutorial.
The following rule is given by the code:
<hr align="center" size="5" width="50%" noshade color="red">Since style attributes within the tag have been deprecated under current standards, they should not be used in HTML5 documents. Instead, they should be avoided in favor of the newer styling methods that will be discussed later.
TOP | NEXT: List Structures
2.7 - List Structures
List Structures
Listing Elements - TOP
HTML 5 provides text structuring in the form of lists. You can produce lists of bulleted items, lists of numbered items, and lists of terms and definitions. The first two lists resemble single-spaced lines of text with the addition of prefixed bullets or numbers. The latter list is similar in display to a series of blockquoted paragraphs.
Unordered Lists - TOP
An unordered list is a series of items preceded by bullet characters and set off from surrounding text by blank lines. The list is single spaced and indented from the left margin. Unordered lists should be used when the order of each item in the list is not important. An example unordered list appears in the 3 browsers as shown in Figure 2-17.
- List Item #1
- List Item #2
- List Item #3
Figure 2-17. Browser display of an unordered list.
An unordered list is created with the block-level <ul> container tag enclosing listed items identified with block-level <li> <ul> container tag enclosing listed items identified with block-level <li> (list item) container tags. The general format for an unordered list is shown in Figure 2-18.
<ul><li>list item</li><li>list item</li>...</ul>Figure 2-18. General format for unordered list.
For example, the bulleted list shown above in Figure 2-17 is given by the following code.
<ul><li>List Item #1</li><li>List Item #2</li><li>List Item #3</li></ul>Listing 2-10. Code for an unordered list in Figure 2-17.
Items in the list are single spaced and preceded by a bullet character. If text for a list item is wider than the width of the page it is word wrapped and indented inside the bullet character. Items can be enclosed inside <p> tags or <br /> tags can be coded between items to increase line spacing between them. The following list, for example, surrounds list items with <p> tags to leave blank lines between entries. Browser output is shown in Figure 2-19.
<ul><li><p>This is the first item in the list. Text following the bullet character is word wrapped inside the bullet. Paragraph tags are used to leave blank lines between items in the list.</p></li><li><p>This is the second item in the list. Text following the bullet character is word wrapped inside the bullet. Paragraph tags are used to leave blank lines between items in the list.</p></li></ul>Listing 2-11. Code for an unordered list of wrapped paragraphs.
This is the first item in the list. Text following the bullet character is word wrapped inside the bullet. Paragraph tags are used to leave blank lines between items in the list.
This is the second item in the list. Text following the bullet character is word wrapped inside the bullet. Paragraph tags are used to leave blank lines between items in the list.
Figure 2-19. Browser display of an unordered list of wrapped paragraphs.
Nested Unordered Lists - TOP
Unordered lists can be nested inside each other. For example, a bulleted list appearing inside a second bulleted list appearing inside a third bulleted list is produced by the following code and is displayed in the browser as shown in Figure 2-20. Note that a nested unordered list is part of the list items of its container list. That is, the <ul>...</ul> tags for the nested list appear inside a pair of <li>...</li> tags of <ul>...</ul> tags for the nested list appear inside a pair of <li>...</li> tags of the enclosing list.
<ul><li>List Item 1</li><li>List Item 2<ul><li>List Item 2a</li><li>List Item 2b<ul><li>ListItem 2b1</li><li>List Item 2b2</li></ul></li></ul></li><li>List Item 3</li></ul>Listing 2-12. Code for nested unordered lists.
- List Item 1
- List Item 2
- List Item 2a
- List Item 2b
- ListItem 2b1
- List Item 2b2
- List Item 3
Figure 2-20. Browser display of nested unordered lists.
Each nested list is further indented inside its container list. Also, different bullet characters are used for nested lists. By default, a disc character marks the outer-most list, a circle marks the next inner-most list, and a square marks the inner list. Notice that when lists are contained inside other lists that no blank lines surround the interior lists as they do when a single list appears within the normal flow of text on the page.
Deprecated type Attribute - TOP
The type="disc|circle|square" attribute can be coded inside the opening <ul> tag in order to specify the style of bullet character to use if different from the default disc character. HTML5 standards do not allow the use of the type attribute and suggest using CSS for specifying bullet characters.
Ordered Lists - TOP
An ordered list is a series of items preceded by sequence numbers and set off from surrounding text by single blank lines. By default, the list is numbered with decimal numbers beginning with 1 and numbered consecutively through the last item in the list. The list is single spaced and indented from the left margin in the same way as an unordered list. Ordered lists should be used when the order of each list item is important. An example ordered list is shown below in Figure 2-21.
- List Item #1
- List Item #2
- List Item #3
Figure 2-21. Browser display of an ordered list.
<ol><li>list item</li><li>list item</li>...</ol>Figure 2-22. General format for ordered list.
For example, the ordered list shown above in Figure 2-21 is given by the following code.
<ol><li>List Item #1</li><li>List Item #2</li><li>List Item #3</li></ol>Listing 2-13. Code for an ordered list.
Items in the list are single spaced and word-wrapped inside the numbering character. <li> can contain other tags like <p>, <blockquote>, <h1>, and other tags. It is important to remember that <ol><li> and <ul><li> is a structure
Nested Ordered Lists - TOP
Ordered lists can be nested inside each other, with subordinate lists indented from the next outer-most list. All nested ordered lists use the same decimal numbering system beginning with decimal 1. For example, the following code produces the numbered lists shown in Figure 2-23.
<ol><li>List Item 1</li><li>List Item 2<ol><li>List Item 2.1</li><li>List Item 2.1</li></ol></li><li>List Item 3</li></ol>Listing 2-14. Code for nested ordered lists.
- List Item 1
- List Item 2
- List Item 2.1
- List Item 2.2
- List Item 3
Figure 2-23. Browser display of nested ordered lists.
Note that when ordered lists are contained inside other ordered lists that no blank lines surround the interior lists as they do when a list appears within the normal flow of page text.
Ordered List Attributes - TOP
A type attribute can be coded inside the opening <ol> tag in order to specify one of five different numbering characters. The attribute value can be <ol type='1'> for decimal numerals (the default), <ol type='A'> for upper-case letters, <ol type='a'> for lower-case letters, <ol type='I'> for upper-case Roman numerals, and <ol type='i'> for lower-case Roman numerals. The tag <ol type='A'>, for example, produces the following list of alphabetically ordered items.
<ol type='A'><li>List Item 1</li><li>List Item 2</li><li>List Item 3</li></ol>Listing 2-12. Code for changing ordered list numbering.
- List Item 1
- List Item 2
- List Item 3
Figure 2-24. Browser display of
<ol type='A'>
You can choose the beginning sequence value of an ordered list by coding the optional <ol start='n'> attribute for the <ol> tag. Here, n must be a valid integer. For instance, a starting sequence value is needed, when an ordered list is interrupted by other elements on the page.
As shown in the output below, two consecutively sequenced lists are separated by a paragraph. The first list begins with "A" and is sequenced through "E" since there are five items in the list. The second list needs to begin its sequence with the sixth letter "F". If a starting value is not specified, sequencing begins anew with "A".
This is the beginning of the list:
- List Item A
- List Item B
- List Item C
- List Item D
- List Item E
This is a continuation of the list:
- List Item F
- List Item G
- List Item H
- List Item I
- List Item J
Code for the above lists is shown below. The first ordered list uses upper-case letters (type="A") beginning with "A" and ending with "E". The second list overrides this default sequencing by specifying start="6" in its opening <ol> tag. Thus, the second list is (type="A") beginning with "A" and ending with "E". The second list overrides this default sequencing by specifying start="6" in its opening <ol> tag. Thus, the second list is ordered consecutively from "F" through "J".
<p>This is the beginning of the list.</p><ol type='A'><li>List Item A</li><li>List Item B</li><li>List Item C</li><li>List Item D</li><li>List Item E</li></ol>><p>This is a continuation of the list.</p><ol type='A' start='5'><li>List Item F</li><li>List Item G</li><li>List Item H</li><li>List Item I</li><li>List Item J</li></ol>>
You can reverse the order of the sequence of list markers through the use of the reversed attribute. This is a boolean attribute that can be applied to an <ol> tag in multiple ways. For instance, you could reverse the order of markers through adding the attribute itself without a value, such as in <ol reversed>. Optionally, you could also add a value to the attribute, and set it equal to either "reversed" or a blank string "". For example, <ol reversed='reversed'> and <ol reversed=''> also accomplishes the same effect. This is true of other boolean attributes you may come across in future elements. All of these forms are valid under HTML5. Below is an example of ordered list with the attribute reversed.
- List Item 1
- List Item 2
- List Item 3
Definition Lists - TOP
A definition list is a series of terms and definitions offset from surrounding text by blank lines. The terms in the list are blocked at the left margin, and definitions are indented and word wrapped on the following lines. An example definition list is shown in Figure 2-24.
- Term 1
- This is the Term 1 definition. The definition term appears on a line by itself and is followed by a definition text block. The definition is indented and word wrapped.
- Term 2
- This is the Term 2 definition. The definition term appears on a line by itself and is followed by a definition text block. The definition is indented and word wrapped.
Figure 2-24. Browser display of a definition list.
<dl><dt>Term 1</dt><dd>Definition text for Term 1</dd><dt>Term 2</dt><dd>Definition text for Term 2</dd>...</dl>Figure 2-25. General formats for definition list tags.
A definition list is enclosed inside <dl> tags and contains one or more <dt> (definition term) tags listing the items to be defined. Each definition term has an associated <dd> (definition description) tag enclosing the definition for the term.
The definition list shown above in Figure 2-24 is produced with the following code.
<dl><dt>Term 1</dt><dd>This is the Term 1 definition. The definition term appears on a line by itself and is followed by a definition text block. The definition is indented and word wrapped.</dd><dt>Term 2</dt><dd>This is the Term 2 definition. The definition term appears on a line by itself and is followed by a definition text block. The definition is indented and word wrapped.</dd></dl>Listing 2-15. Code for a definition list.
When displayed in the browser, items in the list are single spaced with no blank lines appearing between the terms. If you wish to include additional line spacing, you can code <p> tags surrounding the definitions or <br /> tags between them.
A definition list, of course, can be used for purposes other than defining terms. Any situation where you have a name and value relationship among content you can employ a definition list. Another example where a definition list might be appropriate is for a frequently asked questions, or FAQ, section of a web site.
TOP | NEXT: Linking Pages
2.8 - Linking Pages
Linking Pages
Hyperlinks - TOP
The original purpose of the World Wide Web was to provide a mechanism for non-linear access to information. In order to activate this type of retrieval, information is packaged as a set of Web pages, and then hypertext links, or hyperlinks are created to navigate from one page to another in whatever sequence the reader prefers. In a later tutorial, the varieties of page links are discussed more fully. Here you are introduced to the basic concept of linking and shown how to set up text links for navigation between pages.
Most often a link from one page to another is made by creating a text "hot spot" on one page that, when clicked with the mouse, opens a second page which replaces the first page in the browser window. The string of text that is made sensitive to a mouse click can be a single word or several words, usually suggestive of the contents of the destination page. Normally, a second link appears on the linked page for return to the original page. It is considered poor Web citizenship to leave visitors at the end of a series of links with no way to get back to the starting page.
In the illustration in Figure 2-26 two text links cause navigation to different pages. On the linked pages a text link provides for return to the original page.
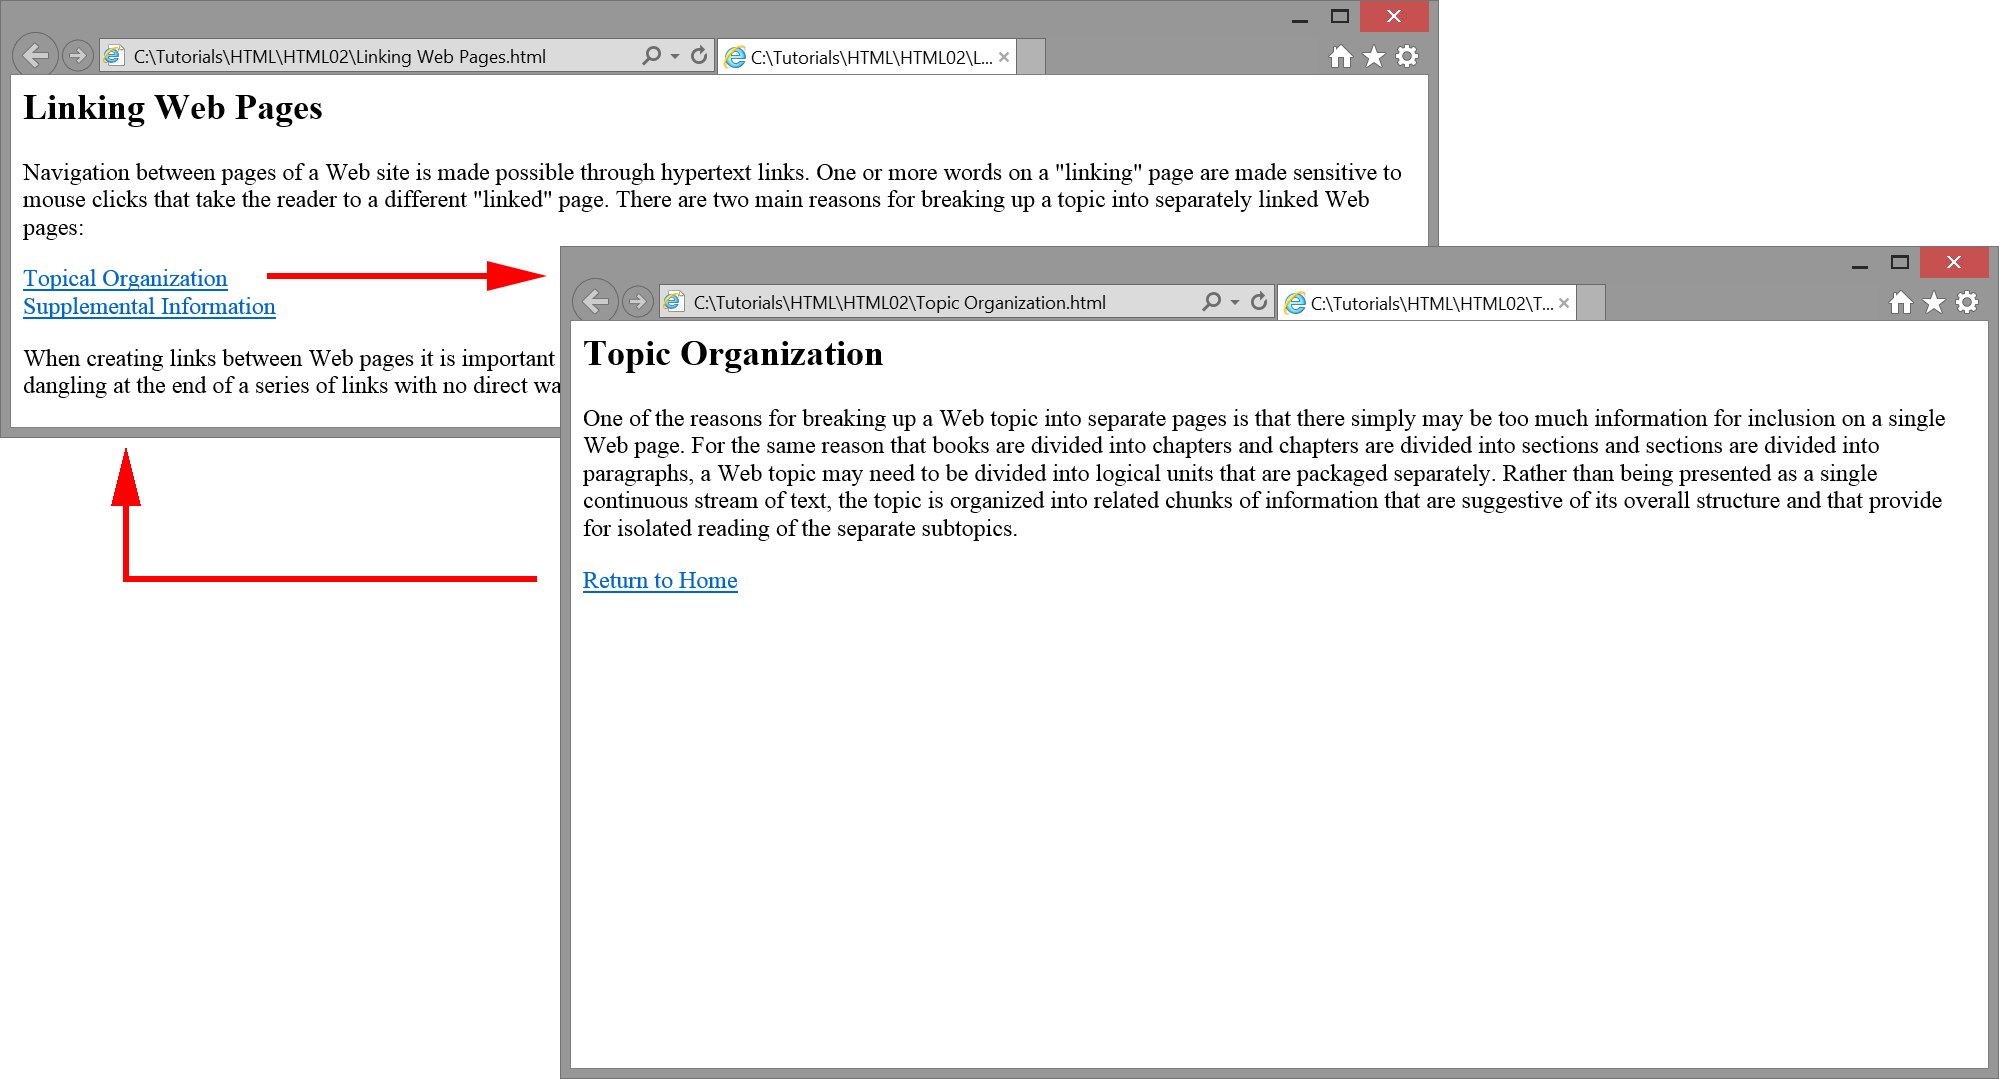
You can test these links by clicking the "Linking Web Pages" text link below. The original page is opened in a separate browser window. From there, you can link to and return from two different pages.
The <a> Tag - TOP
The most common type of link is a clickable word or phrase that transfers directly to the target page. A text link of this sort is created by surrounding the text string with an <a> tag (also called an anchor tag), and specifying the location of the page to which to link. The <a> tag is classified as a container and inline-level tag. The basic format for coding this tag is shown in Figure 2-27.
<a href="url">linking text</a>Figure 2-27. General format for
<a>tag.
The href (hypertext reference) attribute specifies the URL of the linked page. Links can be made to other pages at the local Web site or to pages at remote sites anywhere on the World Wide Web.
If the linked page is in the same location ‒ in the same directory ‒ as the linking page, then the URL is simply the page name. This local link is called a relative link since the path to the linked page is relative to the location of the linking page.
When linking to a remote site, the URL must be a full Web reference including the "http://" protocol followed by the domain name of the site. This external link is called an absolute link since the path to the linked page is a full Web address.
The <a> tag surrounds a string of text that is to be made click-sensitive and that activates the link. Usually the text is descriptive of the destination link. It can be a single letter, a word, a phrase, or any amount of text that can reasonably serve as a link. When this text is clicked, the linking page is immediately replaced by the linked page in the browser window.
The <a> tag is an in-line tag. It does not add any new lines or spaces before or after the content which it wraps.
Local Links - TOP
When creating your own Web site, most of the links will be between your own pages. The easiest way to store these pages for linking is to save them in the same location. That is, in the same disk directory or on the same diskette or storage unit. In this case the URL specified in the <a> tag is simply the name of the page.
In the example in Figure 2-26 there are three Web pages named Home.htm, Organize.htm, and Supplement.htm. The Home.htm page contains text links to the other two pages and is coded as follows.
<h2>Linking Web Pages</h2>

<p>
  Navigation between pages of a Web site is made possible through hypertext
  links. One or more words on a "linking" page are made sensitive to mouse
  clicks that take the reader to a different "linked" page. There are two main
  reasons for breaking up a topic into separately linked Web pages:
</p>

<p>
  <a href="Organize.htm">Topical Organization</a><br>
  <a href="Supplement.htm">Supplemental Information</a>
</p>

<p>
  When creating links between Web pages it is important to provide return
  links to the linking pages. The page author should not leave readers dangling
  at the end of a series of links with no direct way to return to the home page.
</p>
Listing 2-16. Code for linking pages.
Notice the line containing the code
<a href="Organize.htm">Topical Organization</a>
An <a> tag surrounds the string of text "Topical Organization" to convert it into a hyperlink to open the Organize.htm page in the browser window. Only the name of this page is required as the href URL since the linked page appears in the same directory as the Home.htm page from which the link is made. Similar coding links to the Supplement.htm page. When either of the two links is clicked, the associated page is retrieved and loaded into the browser, replacing the Home.htm page.
When either Organize.htm or Supplement.htm are showing in the browser window, it is easy to return to the Home.htm page by clicking the Back button on the browser's Tool Bar. However, it is a better navigation solution to code your own internal links between pages. In other words, both the Organize.htm and Supplement.htm pages should include, as shown here, their own links back to Home.htm.
Coding for the Organize.htm page is shown below. Here the string of text "Return to Home" is made into a link by surrounding it with an <a> anchor tag. A click on this link reopens the Home.htm page in the browser window. Similar coding appears on the Supplement.htm page to return to the home page.
<h2>Topic Organization</h2>

<p>
  One of the reasons for breaking up a Web topic into separate pages is
  that there simply may be too much information for inclusion on a single Web
  page. For the same reason that books are divided into chapters and chapters
  are divided into sections and sections are divided into paragraphs, a Web
  topic may need to be divided into logical units that are packaged separately.
  Rather than being presented as a single continuous stream of text, the topic
  is organized into related chunks of information that are suggestive of its
  overall structure and that provide for isolated reading of the separate
  subtopics.
</p>

<p><a href="Home.htm">Return to Home</a></p>
Listing 2-17. Code for linking back to original page.
The manner in which you set up links between your pages is at your discretion. To a large extent, it depends on how you subdivide your site into separate pages and the way in which the separate topics relate to one another. Make sure there are no "dead end" pages where visitors arrive with no way to get back to where they came from.
Remote Links - TOP
If you know the URL of a Web site anywhere on the World Wide Web you can make a link to that site. This URL is normally in the form
http://domain name
where the http protocol prefixes the site location (domain name). This type of absolute reference takes you to the home page of that site. The following link code, for example, is used to open the home page at www.google.com.
Go to Google<a href="http://www.google.com">Go to Google</a>Figure 2-28. Code and link to an external Web site.
To find out the URL of a Web site simply go there and read the URL that appears in the Address box of your browser. Copy this address into the href attribute of your <a> tag and add the text to make a clickable link.
If you are linking to a particular page at a remote site then the domain name is followed by a path through the directory structure to the specified page. For instance, the following URL accesses a page at sports.yahoo.com containing links to various business sites and services.
NFL Teams<a href="http://sports.yahoo.com/nfl/teams/">NFL Teams</a>Figure 2-29. Code and link to an external Web site and directory structure.
This page is located in the teams subdirectory of the nfl directory of the site. The URL is taken from the browser's Address box for the displayed page.
Link Colors - TOP
Depending on your browser's settings, a text link shows up in different colors as a visual clue to the status of the link. Before a linked page is visited for the first time its text link displays in blue. After the page is visited, the link changes to purple. You can tell at a glance whether or not you have previously visited a page.
In a later tutorial you will learn how you can change these default colors for links that you code.
The target Attribute - TOP
By default, linked pages are opened in the same browser window as the linking page subsequently replacing it. When linking to a remote site, a risk is that your visitors will navigate the remote site and eventually lose contact with your site. They can repeatedly click the browser's Back button to get back to your site, but if they have wandered around the remote site to any great extent then backing up to your site may be impractical. You end up losing your visitors to the remote site.
One way around this problem is to always link to remote sites in a separate browser window. It is quite easy to open a page in a different window. Simply add the attribute target="_blank" to your <a> tag as shown below for the above link to the Google site.
<a href="http://www.google.com" target="_blank">Go to Google</a>
With this technique, visitors can browse the remote site as much as they wish in a second browser window, and by closing that window return immediately to your linking page in the original window.
Creating text links as described here represent only a couple of the ways in which hyperlinks can tie together multiple Web pages. In a later tutorial, other varieties of links and linking methods are discussed.
TOP | NEXT: Displaying Pictures
2.9 - Displaying Pictures
Displaying Pictures
In addition to presenting text content, Web pages can display graphic images. Later tutorials discuss this topic more fully. Here, basic methods of placing pictures on a page are introduced.
Graphic Formats - TOP
There are three popular graphic formats used for Web images. GIF (Graphics Interchange Format) is the most widely supported. Pictures saved in this format have the .gif file extension. GIF format can display images in black and white, grayscale, or color. It is most often used for line drawings, logos, icons, and other "spot color" images, and is usually not for "continuous color" images such as photographs. Incidentally, the acronym GIF is pronounced "jiff."
The PNG (Portable Network Graphics) format was designed as a replacement for the GIF format. PNG, pronounced "ping," has the advantage over GIF of improving image quality while offering better image compression. It does not, however, support animated images. PNG files use the .png extension.
The JPEG (Joint Photographic Experts Group) format, pronounced "j-peg," is designed for storing photographic images. It can represent millions of colors, and uses compression techniques to compact all of color information into small file sizes. Pictures saved in this format usually have the .jpg file extension.
You can display pictures taken with digital cameras or scanned from photographs, or you can copy images from public clip art collections on the Web. If you have available any of the popular graphic editing software packages, then it is usually a simple matter to edit, resize, and convert digital photographs or scanned images to Web formats. Be sure that images are saved in GIF, PNG, or JPEG format for display on your Web pages. Other formats may display properly in the browser, but their large file sizes may make it impractical for visitors to download these images during Web access.
Capturing Images - TOP
Some of you may have the talent to create your own graphic images; most of you probably do not. Therefore, you may need to locate existing illustrations that complement the text content on your pages. The Web is a rich source of graphics, and many pictures are available for capturing. You can use your favorite search engine to locate "clip art" sites with millions of images to choose from. The screen display in Figure 2-30 shows a Google search finding over 32 million sources of clip art.
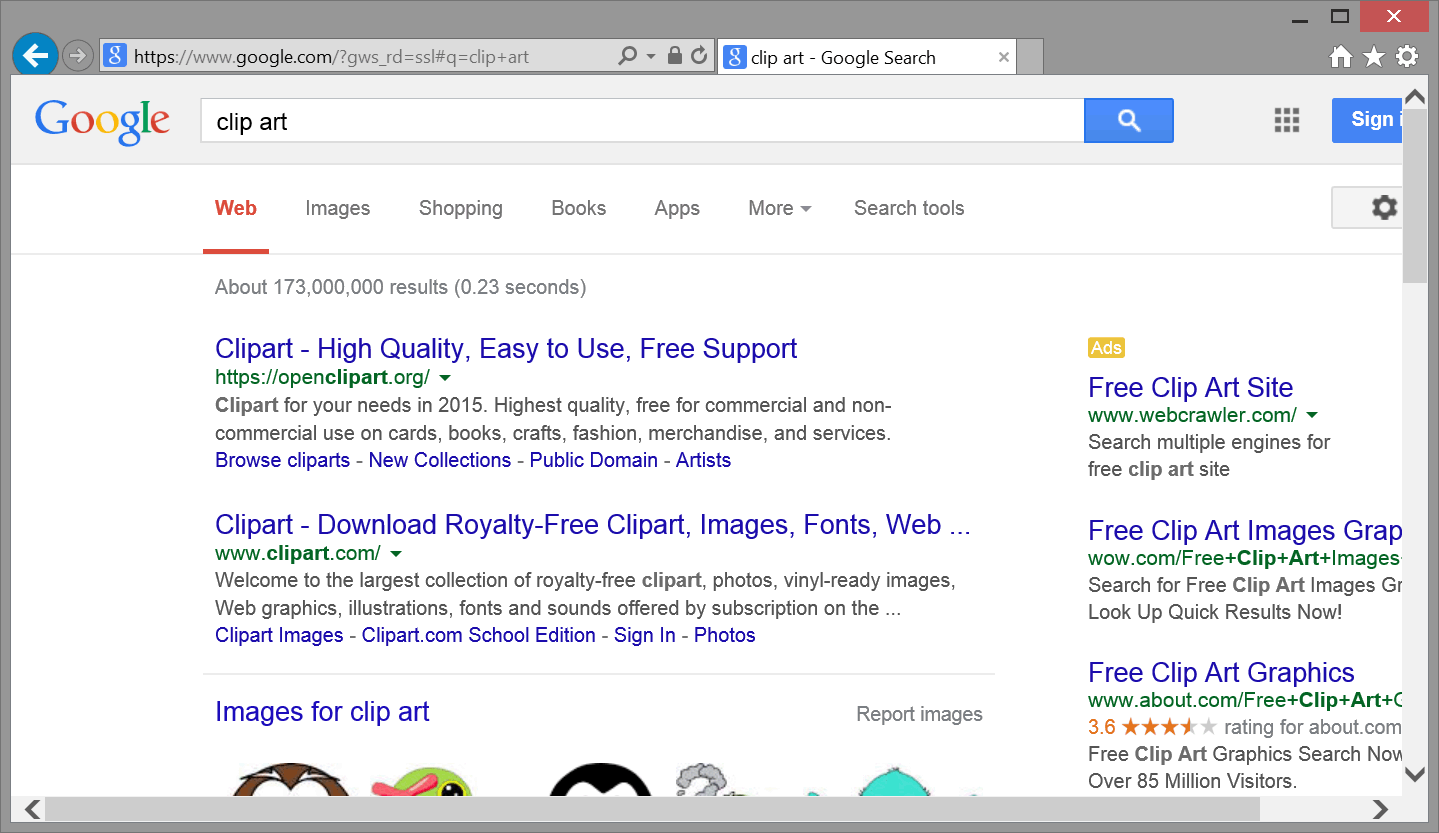
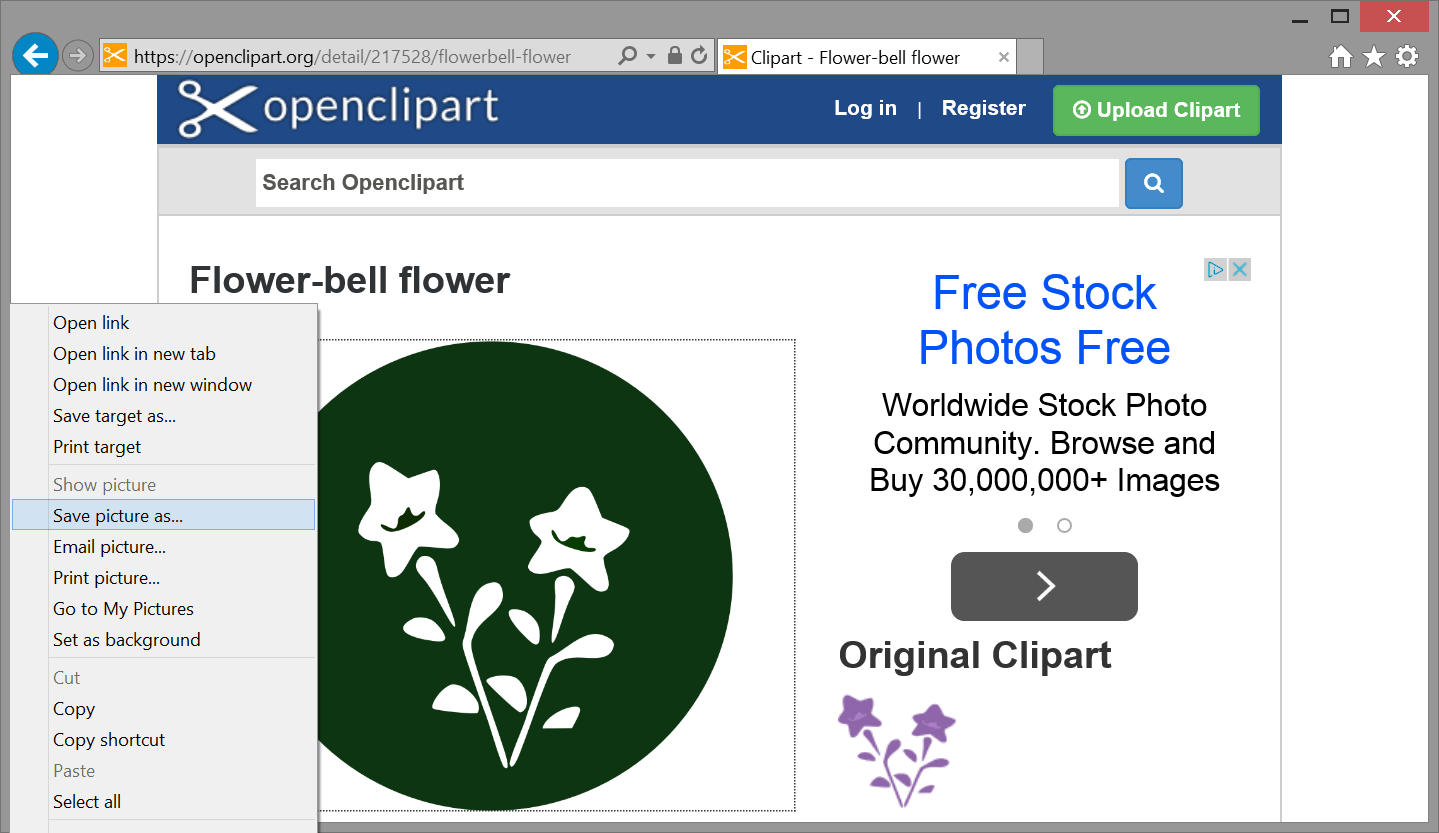
Once you have found the picture you want to download, it is easy to capture it for your use. As shown in Figure 2-31, right-click on the picture and choose "Save Picture As..." from the pop-up menu. In the Save dialog box choose the location on your local PC to download the image. The location can be in the same directory as the Web page on which it will be displayed, or you can create a separate subdirectory for storing media files. You can also rename the picture during its saving if you wish. Be alert to images that are copyrighted. You need permission to use these.
The <img> Tag - TOP
Image formats GIF, PNG, and JPEG are placed on Web pages by using the in-line <img> tag. The general format for this tag is shown below.
<img src="url" alt="text"/>Figure 2-32. General format for
<img>tag.
An <img> tag is coded on the Web page at the location at which the image is to be displayed. The src attribute gives the source, or location, of the image file. If the file is in the same directory as the Web page on which it is displayed, then only the file name is needed as the src URL.
The alt attribute is required under HTML5. Its "text" value gives a brief pop-up description of the image when the mouse is moved on top of the picture. This text string is displayed when users have graphic displays turned off in their browsers, thus giving a text description of missing pictures. Also, the text can be vocalized by special reader software used by visually impaired visitors who otherwise might not be able to see or focus clearly on images.
Note that the <img> tag is an empty tag; it does not use a pair of opening and closing tags since it does not surround any content. It only marks the page location of an image. By default, the picture is aligned at the left margin of the page.
The JPEG image shown in Figure 2-33 is assumed to be located in the same directory as the Web page that displays it. The image is placed on the page at the location of the <img> tag with the accompanying code. (Move your mouse pointer on top of the image to view its pop-up alt box.)
<p><img src="Stonehenge.jpg" alt="Picture of Stonehenge"/></p>
<img> tag.Notice that you do not physically place the image on the Web page. Rather, you include an <img> tag containing a URL address for the image file. When the Web page is loaded into the browser this URL is used to locate the image file, which is then transmitted separately to the browser for display on the page. This is why image file sizes are important considerations. Displaying an image requires an additional data transmission from the Web server ‒ one for each image appearing on the page. Therefore, try to keep the number of images and their sizes as small as possible in order to reduce the number and length of transmissions needed to fill a Web page.
More information about placing images on Web pages is presented in later tutorials. For now, you should be able to modestly decorate your pages with your own pictures or those copied from clip art collections.
Using Graphics as Links - TOP
Graphic images can be used as links in the same way as text strings. In this case, an <img> tag is surrounded by an <a> tag to make the image click sensitive and to link to the page or site coded in the href attribute.
The following image was copied from the www.google.com Web site and saved to a local Web directory. It is placed on the page and made into a clickable link to the site that opens in a separate browser window.
<a href="http://www.google.com"><img src="Google.gif" alt="Link to Google"></a>
Figure 2-34. Code and browser display of an image used as a link.
Notice that the above image is surrounded by a border. In much the same way as text strings used as links are underlined, graphic images used as links are displayed with a border. The border is a visual indication that the picture is a link. You can eliminate the border with the deprecated attribute border="0" coded in the <img> tag. More current techniques for working with borders are described in a later tutorial.
Creating a Media Subdirectory - TOP
As you produce more and more Web pages, you will get to the point where your Web directory starts to become overloaded and disorganized. Preferably, documents and picture files that relate to different Web sites or applications should be kept together inside their own separate subdirectories. This arrangement makes it easier to locate and work with related files.
One of the common ways to begin this organization is to create a separate subdirectory within the main Web directory just for your graphic files. In this way, all of your Web pages remain in the main Web directory and all supporting files reside in the subdirectory. Figure 2-35 shows a typical arrangement of Web directories, with a Media subfolder inside the main Web folder.
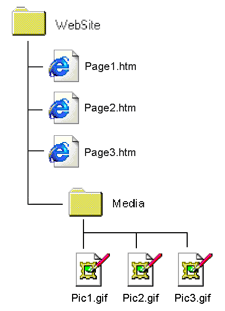
Figure 2-35. Web directory structure.
If you create this Media subfolder, then the relative URL for the src attribute of <img> tags needs to reflect this directory structure. For example, if Page1.htm in the accompanying illustration displays Pic1.gif located in the Media subfolder, then its <img> tag needs to be coded as:
<img src="Media/Pic1.gif" alt="Image Pic1"/>Listing 2-18. Code to access an image located in a
Mediasubdirectory.
This coding indicates that, relative to the directory location of Page1.htm, the Pic1.gif image is located one level down in the directory hierarchy, inside the Media subdirectory. In a later tutorial, the organization of Web pages and supporting files is covered in more detail. At present, you can begin to bring order to your Web files by placing images in a separate subdirectory.
Deprecated Image Alignment - TOP
Horizontal placement of an image can be controlled by enclosing the <img> tag inside a <p> tag which aligns the image to the left, to the right, or centered on the line. Paragraph alignment can use the deprecated align="left|center|right" attribute of the <p> tag. The picture below, for example, is centered on a line by itself and is preceded and followed by blank lines with the enclosing <p> tag.
<p align="center"><img src="Stonehenge.jpg" alt="Picture of Stonehenge"></p>
Later you will learn more about placing and aligning images on a page. For present purposes consider use of the paragraph's align attribute only as a quick fix for aligning images.
Image width and height Attributes - TOP
A downloaded image may not be the exact size you need for your page. The best solution is to open it in a graphic editing program in order to size or crop the picture to the dimensions you need prior to placing it on the page. An alternative is to resize the picture dynamically, during browser display, by setting the <img> tag's width and height attributes:
          width="n"

          height="n"
These n sizes are given in pixels. You need only to set one or the other dimension, but not both, to maintain proportionality. The browser automatically adjusts the other dimension to keep the picture in correct proportion.
The original size of the downloaded image shown below is 480 pixels (width) by 641 pixels (height). It is resized during browser display with the tag:
<img src="Flower.jpg" alt="Picture of flower" width="200">
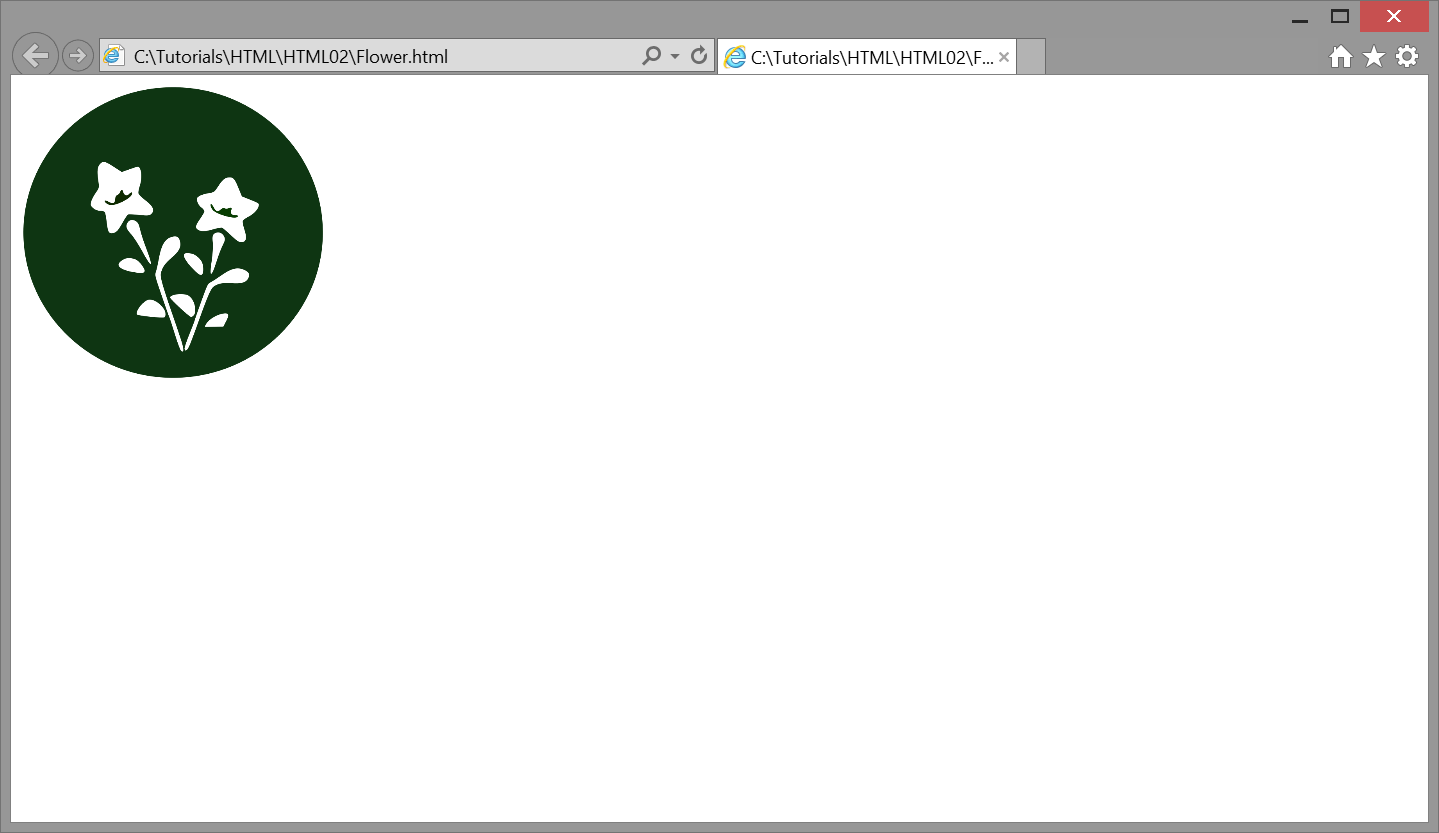
By resetting the display width only, the browser adjusts the height setting to ensure that proper proportions are maintained. Even though the image is resized by the browser, the original image file size remains the same. For large images, this can mean excessive time to display an image since the entire file must be transmitted to the visitor's computer prior to resizing it on-the-fly for screen display.