This chapter introduces the concept of linking pages and resources to create a connected and navigable website. You will learn how to use hyperlinks to connect web pages within a site, link to external websites, and provide access to files and other online resources. Effective navigation is a critical part of web design, allowing users to move easily between pages and find the information they need. In addition to creating basic links, this chapter explores best practices for organizing navigation and improving the user experience. By the end of the chapter, you will understand how hyperlinks serve as the foundation of the World Wide Web and how to use them effectively to build websites that are intuitive, accessible, and easy to navigate.
7.1 - Text Links
Text Links
The feature that best characterizes the World Wide Web is its ability to link directly from one page to any other page anywhere on the Web. Normally, this hyperlinking is triggered by a mouse click on a letter, word, phrase, or graphic image on the linking page, and the linked page is retrieved and loaded immediately into the browser. Web links can be made to local pages on the same Web server as the linking page or to a page at any other site on the Web. This is a very powerful yet easy to use feature that allows you to navigate to pages located around the world with the mere click of the mouse.
The most common type of link is a clickable word or phrase that transfers directly to the target page. A text link is created by surrounding the text string with an <a> anchor tag that specifies the location of the page to which to link. The basic format of the tag is shown in Figure 7-1.
<a href="url">linking text></a>
Listing 7-1. General format for <a> tag.
By default, the linking text is underlined and displayed in blue as a visual clue that the text string is a clickable link. The location of the linked page is given by the href (hyperlink reference) attribute.
You can link to your own page or to a page at a remote Web site. If the local linked page resides in the same directory as the linking page, then only the page name is needed as the URL. If the linked page is on the same Web server as the linking page but in a different directory, then the directory path to that target page is used as the URL (a relative link). If the linked page is at a different Web site, the link must include the protocol and domain reference "http://domain name" (an absolute link). You can link to the site name to retrieve the default home page or, if it is known, to a particular page at that site.
<a href="xhtml07-01.htm">Reload This Page</a><a href="http://www.weather.com">The Weather Channel</a>
The accesskey attribute is used with the <a> tag to identify a keyboard key that can be used in combination with other keys to activate the control. The key combination depends on the browser. In Firefox, the combination is (ALT + SHIFT + accesskey) in Windows or (CTRL + accesskey) on Mac. In Internet Explorer, Chrome, and Safari the combination is (ATL + accesskey). An accesskey value "w" is set for the following link:
The title attribute is used with the <a> tag to add descriptive text to links, especially if the link text itself does not clearly describe the link's destination. The title text appears when the user moves the mouse over the link. A title is set for the following link:
Unless instructed otherwise, the linked page opens in the same browser window that displays the linking page. The original page is replaced by the linked page. Especially when linking to remote sites on the Web, it is often convenient to open that page in a different browser window. When visitors leave your site to browse remote sites, they may not be able to back-click their way to your original page. By opening remote sites in a new window, your visitors do not lose contact with your pages. Your site is always available in the original window. In HTML, you can specify how a linked page is to be opened by coding a target="_window" attribute in the <a> tag.
Listing 7-5. Opening a page in a new browser window.
The above code includes a target set to the value _blank which opens the given URL in a new or blank browser window.
There are other target values, but they apply to using links with inline frames or iframes. These will be discussed later in the inline frames section of the tutorial.
Text links are displayed in three different colors to identify three conditions of a link. An unvisited link is displayed in blue, a visited link is displayed in purple, and an active link (the mouse button is clicked while pointing at the link text) is displayed in red. Also, text links are underlined.
You can override these default colors and underlines as well as include other visual indicators of link status with the style sheet selectors for the <a> tag shown in Figure 7-1.
Property:
Value
a:link a:visited a:hover a:active
Any text properties.
Figure 7-1. Link selectors and stylings.
The a:link selector identifies an unvisited link, the a:hover selector identifies a link with the mouse positioned over it, the a:active selector identifies a link being clicked, and the a:visited selector identifies a link that has been visited. Any combination of text style properties and values can be applied to these linking states. The following style sheet illustrates possible settings for the four link states.
Figure 7-2. Styling link text to respond to user actions.
A normal unvisited link is colored blue but does not display the underline. When the mouse cursor is moved on top of the link it changes to green, is underlined, and is displayed in 1.2em size. When the link is clicked its color changes to red. A visited link is displayed at 1em gray with no underline.
Links are normally made between different Web documents so that visitors can navigate between pages. Links can, however, be made to different locations in the same document by coding a hyperlink to a fragment identifier which is an HTML element such as a <div> that is assigned an id.
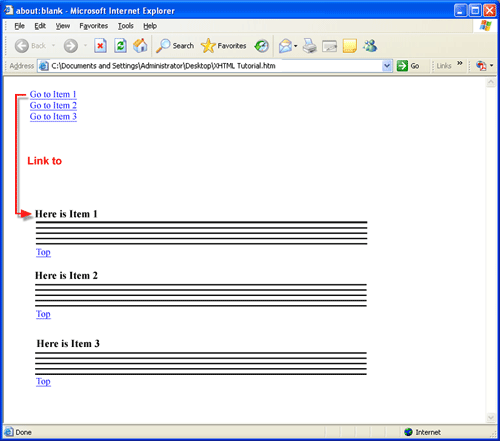
This idea is illustrated in Figure 7-3 where text links at the top of the page transfer to content sections lower on the page. In addition, links at the end of each content section transfer back to the top of the page.
Figure 7-3. On-page links.
In order to create on-page links you need to code the <a> tags shown in Figure 7-4.
<a href="#name">link text</a>
...
<div id="name">"fragment identifier or target text</<div>
Figure 7-4. General formats for <a> tags to create on-page links.
The location to which a link is made is enclosed in an <div id="name">tag that supplies a text value to identify the on-page link destination. Typically, the location of a link leads to a side heading on the page, but any other fragment identifier can be used. The text from which the link is made is enclosed in an <a href="#name"> tag in which this destination name is coded, preceded by "#".
The following code shows three links to three different locations on a page. The target locations have the fragment identifiers ITEM1, ITEM2, and ITEM3. When a link is clicked at the top of the page, the browser scrolls to one of these identified destination links.
<div><a href="#ITEM1"> Go to Item 1</a></div><div><a href="#ITEM2">Go to Item 2</a></div><div><a href="#ITEM3">Go to Item 3</a></div><div id="ITEM1"><b> Here is Item 1</b></div>
...
<div id="ITEM2"><b>Here is Item 2</b></div>
...
<div id="ITEM3"><b>Here is Item 3</b></div>
...
Listing 7-7. Code to create on-page links.
When linking from the top of a Web page to locations farther down the same page, it is a good idea to provide return links to the top of the page. In this example, each linked section (ITEM1, ITEM2, and ITEM3) is followed by a link back to the Top of the page. Each of these on-page links is coded as follows.
<div><a href="#">Top</a></div>
Listing 7-8. Code to link to top of page.
Note that there is no on-page destination name given in the link URL: href="#". When no named location is given for an on-page link, the browser returns to the top of the page by default.
Fortunately, you can supply a named text value as the return destination for linking back to the top of the page or to any other location on the page. For instance, you could add a heading at the top of the page as the return link target.
    <h1><div id="TOP">Top of Page</div></h1>
    .
    .
    .
    <div><a href="#TOP">Top</a></div>
Listing 7-9. Code identifying a named target at top of page.
Now when a Top link is clicked, the page is scrolled to the named location of the heading "Top of Page."
It is possible to link from one page to a specified location on a different page by combining an external link with an on-page link. Assume, for instance, that you need to link to a section of NextPage.htm that is identified with the tag <div id="SECTION3">. Use the format for an on-page link -- <a href="#name"> -- and simply prefix the target #name with the name of the page.
<div><a href="NextPage.htm#SECTION3">Go to Section 3 on Next Page</a></div>
Listing 7-10. Code to link to a named target on a different page.
This link transfers to a page named NextPage.htm and scrolls to the tag identified with <div id="SECTION3">. This type of linking can normally be done only with pages you create. It is unlikely that you would know the named target sections of remote pages even if they are available for linking.
You can create links to documents other than Web pages. You can use the <a> tag to link to text documents, word processing documents, spreadsheets, graphic files, and other types of documents. The manner in which the browser treats the linked document depends on the document's file extension and how the browser is set up to handle non-HTML extensions.
Text Files
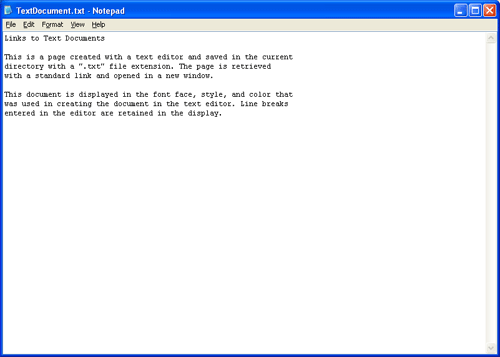
Standard text files with the .txt extension are opened in the browser just like an XHTML document. The file is displayed in the original font face and style used to create the document. Furthermore, the browser maintains original line breaks and spaces coded in the document. The link below retrieves a text document located in the same directory as the Web page containing the link and opens it in the browser as shown in Figure 7-5.
<p><a href="TextDocument.txt">Display Text Document</a></p>
Figure 7-5. Text document opened in browser window.
In this example, the text document is opened inside the browser window, and replaces the linking page. However, when a document with a .txt file extension is opened in a separate window, it is opened by the program associated with that file type. In the case of a .txt file, the default text editor program, normally Notepad, is used to open the document, which then appears inside the external Notepad window. If the user has chosen a different editor program as the system default, then the document is opened inside that program.
Word Processing Documents
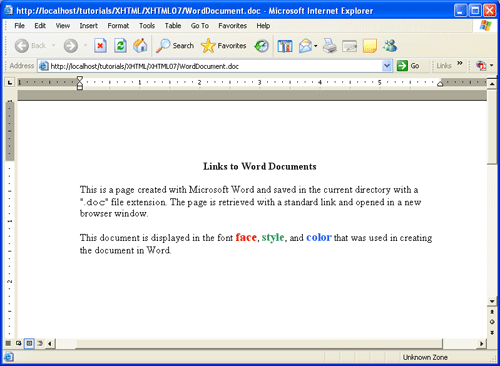
Word processing documents can be displayed in the browser if compatible software is available on the the user's computer. When linking to a Microsoft Word document -- and Microsoft Word (or the special Word reader software) is installed on the user's computer system -- then the Word document opens inside the browser window. The following link opens a Word document by replacing the linking page as shown in Figure 7-6.
<p><a href="WordDocument.doc">Display Word Document</a></p>
Figure 7-6. Word document opened in browser window.
Notice that the Microsoft Word program opens inside the browser window and that a subset of Word menus is added to the browser's Menu Bar. Users can perform basic editing of the Word document and can save it to their local computers. Of course, they can only edit and re-save the copy of the document displayed in the browser window. No alterations may be made to the original document. The browser's Back button is used to return to the linking page. If the linked document is opened in a separate browser window it also includes the subset of Word editing menus.
Spreadsheet Documents
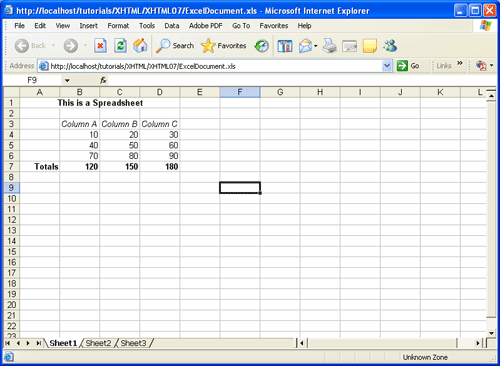
As with word processing documents, spreadsheets are displayed in the browser if compatible software is available on the user's computer. When linking to a Microsoft Excel document -- and Microsoft Excel (or the special Excel reader software) is installed on the user's system -- then the spreadsheet opens inside the browser window. The following link opens an Excel spreadsheet in the same browser window as the linking page as shown in Figure 7-7.
Figure 7-7. Excel document opened in browser window.
A subset of Excel menus is added to the browser's Menu Bar for minor editing and saving of the document to the local computer. The Back button is used to return to the linking page. A similar display opens when the link is made to a separate browser window.
Presentation Documents
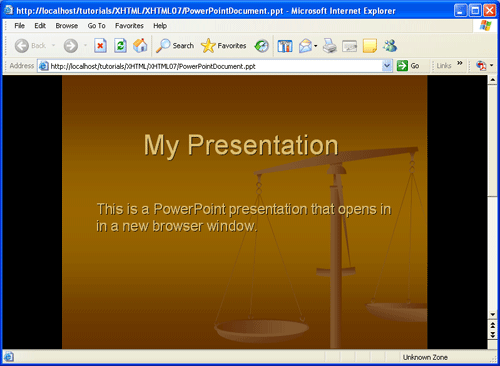
Slide presentations are displayed in the browser if the same software is available on the user's computer. When linking to a Microsoft PowerPoint document -- and PowerPoint (or the special PowerPoint reader software) is installed on the user's system -- the presentation opens inside the browser window. The browser's Back button is used to return to the linking page. The following link opens a PowerPoint document for display in the browser window as shown in Figure 7-11.
Figure 7-8. PowerPoint document opened in browser window.
Graphic Files
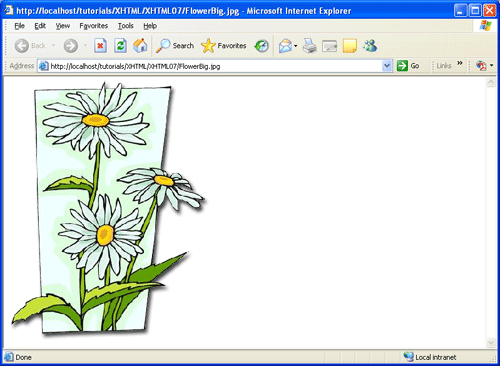
GIF, PNG, and JPEG images can be displayed in the browser through direct links to these graphic files. In other words, it is not necessary to embed a graphic on a Web page in order to display it. Simply by linking to files with .gif, .png, and .jpg file extensions the images are opened directly inside the browser.
Since the images are not formatted on a Web page, they are positioned in the top-left corner of the browser window at their original sizes. The following link opens a .gif image file as shown in Figure 7-9. When the image opens in the same browser window, the Back button is clicked to return to the linking page.
There is a variation of the href attribute that permits you to set up an email link. A click on the link opens the visitor's default email program for correspondence with the address provided in the link. The general format for this link is shown in Figure 7-10.
The href="mailto:" attribute is followed by an email address which should be the address at which you wish to receive correspondence from visitors. For example, the following link opens the visitor's email program (the one that is set as their browser's default email program), and inserts the specified email address into the address line.
<p><a href="mailto:anybody@mail.mga.edu">Contact Me </a></p>
Figure 7-10. Opened email program from href="mailto:" link.
When linking to documents, you can also specify whether the target file will be downloaded by using the download attribute. This is a new HTML 5 attribute and currently has only limited browser support. The value of the attribute specifies the name that will be assigned to the file once it is downloaded. If a value is omitted, the original file name will be used.
In this case, when the hyperlink is clicked, the file will also be downloaded with the name "Flower.gif"
Using CSS and Pseudo-Classes to Build Navigation Buttons - TOP
The navigation buttons below are coded using a combination of CSS, pseudo-classes, and the anchor tag. These buttons can be used instead of graphics buttons. They require no special graphics application to develop and save on bandwidth used by graphics files. Notice how the appearance changes when the mouse hovers over the menu buttons.
Links can be triggered by graphic images by enclosing an <img> tag inside an <a> tag. The general format for assigning links to graphic images is shown below.
<a href="url"><imgsrc="url" alt="text"></a>
Listing 7-11. General format for graphic link.
Images are particularly effective for links since, with informative graphics, you can tell at a glance the site destinations. The links coded in Listing 7-12 and shown in Figure 7-11 are made from images taken from their associated sites.
By default, the link graphic is surrounded by a border to indicate that it is a link, and it serves the same purpose as the underline style of text links. In this example, the border is suppressed by including a style sheet to set image borders to 0px in width.
When using graphic images as links, it is also a good idea to provide text links as well. This is done in the current example by including separate text links which are aligned at the middle of their associated images through the style sheet vertical-align property.
Recall that a remote Web site should be opened in a separate browser window so that the user remains in contact with your site. The above links are modified in the following code to open them in a new browser window using the target attribute described previously.
An image map is a graphic image with clickable areas that link individually to different pages. Often, images maps are used to display a large image on the opening page of a site with portions of the image representing links to the separate site areas to which the visitor can navigate. The clickable areas of the graphic can take the form of circles, rectangles, and/or multi-sided polygons.
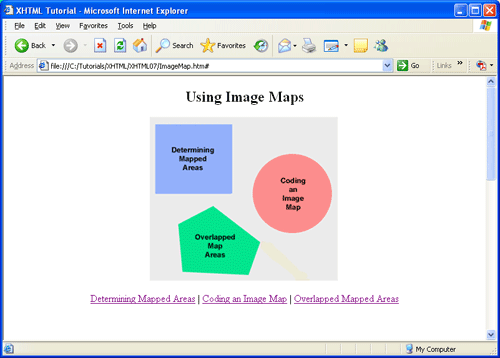
The image map and accompanying text links shown in Figure 7-12 are on-page links to headings appearing farther down the page. This image map uses graphics of the basic shapes that can be defined for clickable areas. These shapes, however, can be superimposed on any type of graphic, including photographs and complex line drawings.
Figure 7-12. Image map and accompanying text links.
To create an image map you start with the picture on which you wish to map clickable areas. Then, using a graphic program to display the image, you determine the shapes and sizes of the different areas to which you wish to assign links. Usually, graphic programs display the horizontal and vertical coordinates of the mouse pointer as you move it around the image. By viewing this display, you can determine the exact pixel coordinates that define the shapes of those clickable areas. Once this information is determined, you can code the HTML to convert the picture to an image map.
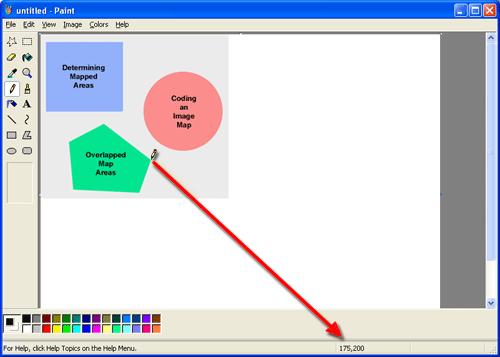
Figure 7-13 shows the picture from which the above image map is made. The image is displayed in the Windows Paint program which can track the movement of the mouse around the image.
Figure 7-13. Determining horizontal and vertical coordinates on graphic image.
Notice in the status bar of the window that the horizontal and vertical coordinates of the "pencil" pointer are displayed. The pointer is at one of the corners of the polygon shape and the tracking position shows 175,200. Im other words, the pointer is 175 pixels from the left edge of the image (horizontal position) and 200 pixels from the top edge of the image (vertical position). Coordinates are always measured from the top-left corner of the full image.
You need different positioning information depending on the shape of the mapped area.
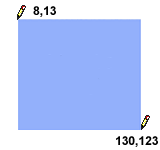
For a rectangle you need to know the horizontal and vertical coordinates of the top-left and bottom-right corners. These two h,v coordinates can be determined by placing the pencil pointer at each of these corners and reading the coordinates from the status bar. In the above graphic, these two pixel coordinates are top-left = 8,13 and bottom-right = 130,123.
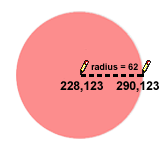
For a circle, you need to know the coordinates of the center point and the pixel width of the radius. The center coordinates of the above circle are determined by positioning the pencil pointer at the (approximate) center and reading the status bar = 228,123. The radius is the distance from the center to the edge of the circle. You can determine the radius by reading the coordinates of the right edge of the circle (at the same vertical position as its center point) and finding the difference between the horizontal center and horizontal edge: radius = (290 - 228) = 62.
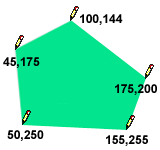
For a polygon you need to know the coordinates of each of its corner points tracing either clockwise or counter-clockwise around its boundaries, starting at any corner point on the polygon. Tracing clockwise from the top of the above polygon the coordinates are 100,144; 175,200; 155,255; 50,250; and 45,172.
With these shape coordinates in hand, you are ready to code the image map and to assign URL links to the different shapes.
The image to become an image map is placed on the page using an <img> tag. Along with its standard attributes this tag contains a usemap="mapname" attribute that points to a like-named <map> tag giving descriptions of the areas of the image that are clickable for linking. The general formats for the <img> and <map> tags are shown in Listing 7-14.
Listing 7-14. Associating a displayed image with an image map.
In the <img> tag a #mapname is assigned in order to associate the image with a <map> tag identified by mapname. Inside the <map> tag are <area> tags, one for each mapped area in the image. These tags specify the shape, pixel coordinates, and link page for all clickable areas.
The following code defines the picture shown above in Figure 7-13 as an image map with links to different on-page headings on a Web page.
Note the relationship between usemap="#MyImageMap" in the <img> tag and name="MyImageMap" in the <map> tag. The id "MyImageMap" associates the image map with the graphic image. Also, when coding the final page, both the <img> and the <map> tags must appear inside a block-level tag such as a <p> or <div>.
The <area> tags give the coordinates (coords) to define the individual shapes and to associate a URL with a mouse click on that shape. In this example, the URLs are on-page links, and you can link to other pages at your site or to external Web sites.
When shape="rect" (rectangle), the coords are specified by four numbers separated by commas. This notation represents two pairs of h,v coordinates, the first pair giving the coordinates of the top-left corner of the rectangle, and the second pair giving the coordinates of the bottom-right corner (8,13,130,123).
When shape="circle", the coords are specified by three numbers separated by commas. The first two numbers represent the h,v coordinates of the center point of the circle and the last number is the pixel width of the radius (228,123,62).
When shape="poly" (polygon), the coords are specified by as many pairs of h,v coordinates as there are points on the polygon. Number pairs can be listed clockwise or counter-clockwise around the polygon; they are separated by blank spaces (100,144,175,200,155,255,50,250 45,175).
The <map> tag can appear anywhere on the page. Wherever it might be located in the body of the document it is associated with the proper <img> tag through the map name.
Even if you produce image maps with the alt attribute coded for each clickable area along with alt text for the <img> tag itself, it is still a good idea to provide a set of comparable text links for visitors with text reader software or for those who have graphics turned off in their browsers.
If necessary, you can have overlapping mapped areas. When the mouse is clicked in the overlap area, the link that takes precedence is the one associated with the shape that is coded first in the <map> tag.
In the example in Figure 7-14, a click in the overlap area links to the URL specified for shape="rect". Its definition appears prior to shape="circle" in the image map even though the graphic of the circle overlays the graphic of the rectangle.
Figure 7-14. Precedence of overlapped image map areas.
You might also wish to assign a link to the area of an image that is not specifically mapped to any of the shapes. A link associated with this "background" shape should appear last in the list of <area/> tags so that it does not take precedence over other shapes as an overlapping image. The coordinates for the background would encompass the entire rectangular area of the picture.
The following listing shows image map and link coding for the page described in the current example. The text paragraphs are not fully coded. Only the on-page links to these sections of the page are coded fully.
This example uses on-page links for the image map. The href attribute of an <area> tag can likewise open an external Web site in the same or in a new browser window.
You probably have visited Web sites at which you are automatically redirected from one page to another. This technique is often used when a home page is moved from one URL to another. For a certain period of time, the original URL redirects to the new URL until users have a chance to change their bookmarks or link references.
Redirection is provided with a <meta> tag which appears in the <head> section of the document, and in general, is used to provide information about the HTML document. A general format for this redirection type tag is shown below.
The http-equiv attribute identifies this use of the <meta> tag as a refreshing, or reloading, of the current page. The content attribute specifies the number of seconds to wait before reloading takes place, along with the URL of the page to which redirection is to take place when the current page is reloaded.
For example, the following link goes to a page named Redirect.htm located in the current directory. The Redirect.htm page is coded with a meta tag that redirects back to this page after five seconds.
A <meta> tag with http-equiv and content attributes can also be coded on a series of pages to provide a self-running slide show that automatically loads one page after another. Each <meta> tag specifies the viewing time for the page along with a link to the next page in sequence.
The following graphic link loads the first (Slide1.htm) of five pages of a slide show that are all located in the current directory. This initial link is coded below.
Each of the slide show pages contains a <meta> tag giving the URL of the next page in sequence and setting the refresh timer for three seconds. The following abbreviated code appears on the slide pages.
<head><title>Slide 1</title><meta http-equiv="refresh" content="3; url=Slide2.htm"></head><body><h1>Toy Story</h1><p><img src="ToyStory.jpg" alt="Toy Store Image"></p></body><head><title>Slide 2</title><meta http-equiv="refresh" content="3; url=Slide3.htm"></head><body><h1>A Bug's Life</h1><p><img src="BugsLife.jpg" alt="A Bugs's Life Image"></p></body><head><title>Slide 3</title><meta http-equiv="refresh" content="3; url=Slide4.htm"></head><body><h1>Finding Nemo</h1><p><img src="FindingNemo.jpg" alt="Finding Nemo Image"></p></body><head><title>Slide 4</title><meta http-equiv="refresh" content="3; url=Slide5.htm"></head><body><h1>Monsters, Inc.</h1><p><img src="MonstersInc.jpg" alt="Monsters, Inc. Image"></p></body><head><title>Slide 5</title><meta http-equiv="refresh" content="3; url=xhtml07-04.htm"></head><body><h1>Toy Story 2</h1><p><img src="ToyStory2.jpg" alt="Toy Store 2 Image"></p></body>
Listing 7-19. Partial coding for slide show pages.
The final page of the slide show redirects back to this tutorial page containing the original link to the first slide.
If you want to run the show in a separate browser window, then the original link opens a new window.
Listing 7-20. Opening a slide show in a separate browser window.
Note that since a <meta> tag cannot close a browser window, the final slide page that is opened in this separate window should not contain a <meta> tag to redirect back to the original page, thereby resulting in the original page being opened in two separate windows: in the original window and in the separate slide-show window. Rather, the final page of the slide show should inform visitors simply to close the slide show window to reveal the original window containing the original link page.
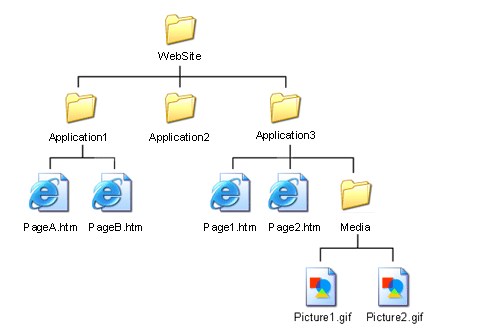
As you accumulate a large number of Web documents, you will likely begin organizing different Web applications within separate directories subordinate to your root directory -- subordinate to your main Web directory. Figure 7-16 illustrates this idea with three subdirectories within root directory Website, each containing Web pages. In addition, application3 folder contains a Media subdirectory for storing all graphic files pertaining to that application.
Figure 7-16. Example Web directory structure.
When coding the src attribute in an <img> tag or the href attribute in an <a> tag, you need to trace the directory hierarchy from the Web page containing the tag to the location of the actual image or page specified in the link. This means that you may need to go down one or more levels of directories to find the picture or linked page; or that you need to go up the hierarchy to find the picture or page; or that you need to go up the hierarchy into a higher-level directory and then down into the folder containing the image or link.
The reason for this up and down traversing of directories is because linked pages or images are referenced relative to the page containing the link. By way of illustration, suppose that PageA.htm in directory Application1 contains an <img> tag pointing to Picture1.gif in the Media subdirectory of directory Application 3. In order to make the src reference from PageA.htm to Picture1.gif, the following path is followed:
Go up one level from the Application1 folder to the WebSite folder.
Go down one level from the WebSite folder to the Application3 folder.
Go down one more level from the Application3 folder to the Media folder.
Two types of path specifications are used to traverse a directory hierarchy to locate Web pages and graphic images:
Code two dots followed by a forward slash ("../") for each level traversed up the folder hierarchy.
Code a folder name followed by a forward slash ("/") for each level traversed down the folder hierarchy;
For example, the URL for an <img> link from PageA.htm to Picture1.gif would be
<img src="../Application3/Media/Picture1.gif">
Listing 7-21. Linking to a graphic file by traversing directories.
From the current directory containing PageA.htm, back up one level (../) from the Application1 directory to the WebSite directory. From the WebSite directory, go down through the Application3/ and Media/ directories to find Picture1.gif.
Normally, path specifications are not as complex as this. It is common for a folder containing Web pages to compile all images used on those pages into a single Media subfolder inside the page folder. Then, a src link to an image would only need to point down one level of directories:
<img src="Media/Picture.gif">
Listing 7-22. Linking to a graphic file in a subdirectory.
The above examples connect from a Web page to an image. The same process is followed when linking from one page to another. In the above directory structure, a link appearing on PageA.htm to Page2.htm would be
<a href="../Application3/Page2.htm">To to Page2.htm</a>
Listing 7-15. Linking to a Web page in a different folder.
It is fairly simple to trace the path from a Web page to a graphic image or other Web pages if you focus on the folder structure by starting with the folder containing the page and ending at the folder containing the file. Remember to pay attention to the directory tree. You must follow the hierarchy up and down the branches of the tree rather than make lateral references where no "lines' connect the folders.